


Getting Started
Manual Documentation Number: PES1A/PESV1A-4905m 11
B&B Electronics Mfg Co Inc – 707 Dayton Rd - PO Box 1040 - Ottawa IL 61350 - Ph 815-433-5100 - Fax 815-433-5104 – www.bb-elec.com
B&B Electronics Ltd – Westlink Commercial Park – Oranmore, Galway, Ireland – Ph +353 91-792444 – Fax +353 91-792445 – www.bb-europe.com
C
C
h
h
a
a
p
p
t
t
e
e
r
r
3
3
:
:
G
G
e
e
t
t
t
t
i
i
n
n
g
g
S
S
t
t
a
a
r
r
t
t
e
e
d
d
1. Check the contents of your PES1A/PESV1A package. It should
contain…
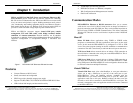
The PES1A or PESV1A module
A printed version of this user manual
A printed version of the PES1A/PESV1A Quick Start Guide
CD-ROM disc with discovery software, RealPort software, this manual, Quick
Start guide
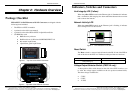
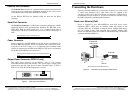
2. Set up the Hardware
Connect your PC to the network
Connect the PES1A/PESV1A serial port to your serial device (Use a serial
cable if it is DCE, null modem cable if it is DTE.)
Connect the PES1A/PESV1A Ethernet connector to a PoE-enabled network
switch or hub (CAT-5 cable)
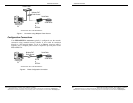
3. Power it Up
Power is applied when the Ethernet (PoE) cable is connected
When a connection is established with the network the yellow LED will
illuminate
The PES1A/PESV1A will automatically try to obtain an IP address, or
generate one itself
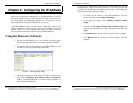
4. Get the IP Address
Use the discovery software on your CD (finder.exe) to get the IP address for
your PES1A/PESV1A
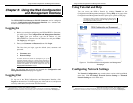
5. Login
In a web browser on your PC, type in the IP address and access the Web
Configuration and Management Interface
Login using the username ‘root’ and password ‘dbps’
Getting Started
12 Manual Documentation Number: PES1A/PESV1A-4905m
B&B Electronics Mfg Co Inc – 707 Dayton Rd - PO Box 1040 - Ottawa IL 61350 - Ph 815-433-5100 - Fax 815-433-5104 – www.bb-elec.com
B&B Electronics Ltd – Westlink Commercial Park – Oranmore, Galway, Ireland – Ph +353 91-792444 – Fax +353 91-792445 – www.bb-europe.com
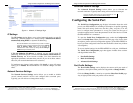
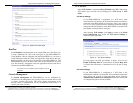
6. Configure the PES1A/PESV1A
In the Configuration, Serial Ports page select the Port Profile you require for
use with your application (E.g. RealPort for virtual COM port, TCP Server,
UDP server, Serial Bridge, etc)
Configure the serial port settings for the selected Port Profile (E.g. In TCP
Sockets select client or server, TCP port numbers, etc.) Also configure baud
rate, data bits, etc in Basic Serial Settings.
Configure any required alarms and notification
If RealPort profile was selected (virtual COM port) do the next step (Set up
VCOM)
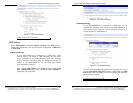
7. Set up VCOM (if using the RealPort profile)
Start the RealPort software wizard (located on the included CD)
Select Add a New Device
Select your PES1A/PESV1A from the list
Select an unused COM port number
Follow the wizard to set up a virtual COM port
8. Communicate
Configure and then start your application