


Phantom Power
If you are using a condenser microphone that requires phantom
power to operate, turn on the switch labeled “48V” for the channel
that it is connected to. Dynamic microphones, wireless receivers
and connections to mixing boards should not have phantom power
activated so be sure that the switch is OFF when using these
devices.
MONO / STEREO Switch
Set the switch to MONO if using a single microphone. Set it to
STEREO when using two microphones.
Gain Control
Each channel of the DXA-8 has a gain control to provide the optimum
amount of amplification for your particular microphone. Note that
even with the gain setting fully counter clockwise for minimum gain,
you will still get some audio signal.
Set the gain control for the desired volume level on the camcorder.
Sensitive condenser type microphones like the popular Sennheiser
ME66 will require a minimum amount of gain while most dynamic
type microphones require maximum amount of gain. Use the level
indicator and your headphones on the camera as a guide. See the
limiter description below for information on proper gain setting when
the limiter is active.
Limiter
Each channel has an independent limiter to prevent distortion
caused by excessively hot inputs. We recommend that this switch
be activated at all times to ensure clean, distortion free audio. When
activated, the corresponding LMT indicator will flash in proportion to
the amount of limiting. Set the gain control so that the indicators are
flashing regularly. If they are on continuously, decrease the gain.
Ground Lift Switch
Set the G1/G2 ground switch on the DXA-8 to the position that gives
you the least amount of noise. This switch allows the input and
output grounds to be isolated to prevent ground noise on some Sony
camcorders.
Record
You are now set up and ready to record your audio. By keeping the
limiters activated, you can ensure distortion free audio without having
to constantly fuss with the audio levels. Happy recording!
©2006 BeachTek Inc.
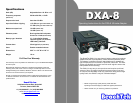
The DXA-8 adapter allows you to attach two balanced XLR type
microphones to your camcorder. In addition, an AUX mini-jack gives you the
option of using an unbalanced input for the right channel. The input signals
are transformer balanced, amplified and sent through a limiter circuit. Finally,
the output signals are sent through an isolating transformer for freedom from
grounding problems. The attached shielded cable terminates in a stereo mini-
plug that connects to your camcorder’s microphone jack.
When the phantom power is activated, the DXA-8 supplies 48 volts to power
condenser microphones.
The DXA-8 can accommodate a wide variety of consumer or professional
microphones. The gain control allows adjustment for virtually any microphone
type and ensures the maximum headroom and the best signal to noise ratio.
A switch lets you select between stereo or mono operation. For stereo operation,
the adapter sends the left input signal to the left channel and the right input signal
to the right channel. The two channels are never mixed allowing you to access
both channels during editing for maximum versatility. For mono operation, both
channels are mixed together - ideal when using only one audio source to give
you two channel recording.
A ground lift switch labeled G1 / G2 provides either an isolated or connected
ground between the adapter chassis and output cable ground.
Operation
Mounting and Connection
Mount the DXA-8 securely to the tripod bushing on the under side of
your camcorder. Connect the cable from the DXA-8 to the camcorder’s
microphone jack. The camcorder’s onboard microphone should now
be disabled. You are now ready to attach external microphones to the
adapter.
Power
Install a fresh 9 volt battery in the adapter. Turn on the PWR switch
to activate the unit. The LED above the switch should light to indicate
good battery power. Turn off power when not in use to conserve
battery power
Initial Setup
Set the camcorder to “manual” audio to deactivate the AGC. Turn the
gain control on the camcorder to a very low setting – about 20% of
maximum. If you later determine that you require more volume, you
can increase the camcorder gain. Many camcorders will either have
a “peak” indicator to warn of high audio levels or a VU meter or both.
If the peak indicator ever comes on, or the VU meter reaches 0 VU,
then you will need to decrease the camcorder gain setting to avoid
distortion.