


6
Installing the KVM Switch
6
Pre-Configuration
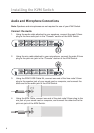
Where to Place the KVM Switch
The compact size of the KVM Switch makes it perfect for desktop placement.
Consider the following when deciding where to place the KVM Switch: whether
or not you intend to use the direct-access port selectors; the length of the cables
attached to your keyboard, mouse, and monitor; the location of your CPUs from
your console; and the length of the cables you use to connect your computers to
the KVM Switch.
Cautions and Warnings
Avoid having cables near fluorescent lights, air-conditioning equipment, or
machines that create electrical noise (e.g., vacuum cleaners).
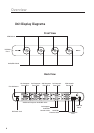
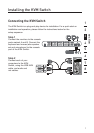
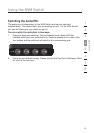
Single-Switch Installation
This section provides complete instructions for the hardware setup of a single KVM
Switch. (F1DH102L or F1DH104L)
Important Note: Before attempting to connect anything to the KVM Switch or
into your computer(s), make sure that everything is powered off. Plugging and
unplugging cables while computers are powered on may cause irreversible damage
to the computers and KVM Switch. Belkin will not be responsible for damage
caused by these actions.
For each dual-head VGA/USB computer to be connected to the Switch, one
dual-head VGA/USB cable is necessary.
Cables are available in longer lengths; see part numbers below:
10 ft. Cable – F1D9105-10
15 ft. Cable – F1D9105-15