


12
Secure DVI-I KVM Switch with Audio
INSTALLATION
SECTIONSTable of Contents 1 2 3 4 5 6 7 83
INSTALLATION
SECTIONSTable of Contents 1 2 3 4 5 6 7 83
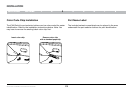
Step 4 Powering Up the Computers
Power up all the attached computers and check for display
and peripheral functionality. All computers can be powered on
simultaneously.
Note: Your computers should recognize the Switch and automatically
install the HID USB driver if necessary. Refer to the Troubleshooting
section of this manual if you are having problems with the USB
keyboard or mouse.
When you power on your computers, the Switch emulates both a
mouse and keyboard on each port and allows your computers to
boot normally. The computer connected to port “1” will be displayed
on the monitor. Check to see that the keyboard, monitor, and mouse
are working normally. Proceed to do this with all occupied ports to
verify that all computers are connected and responding correctly.
If you encounter an error, check your cable connections for that
computer and reboot. If the problem persists, please refer to the
Troubleshooting section in this User Manual.
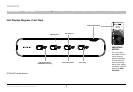
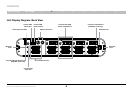
Step 3 Connecting Computers to the Switch
3.1 Make sure all computers are powered off.
3.2 Using the Belkin Dual DVI/USB KVM Cable Kit, connect the
computers to a port on the rear of the KVM Switch. (Refer to
diagram on page 8)
Note: The Cable Kit must be connected directly to a free USB port on
your computer, with no USB hubs or other devices in between.