


USING YOUR KVM SWITCH
21
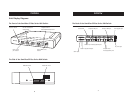
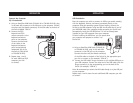
Connecting Computers
1. Connect a keyboard, monitor, and mouse to the computer you prepared
for firmware updates. It must run Windows XP, 2000, NT, 95, 98, or Me.
2. Connect the power adapter to the Switch.
3. Connect the custom flash cable (DB25 male-to-RJ45, included with
purchase). Connect one end of DB25 to your computer’s parallel port
and the other end of the RJ45 to the Switch’s flash-upgrade jack.
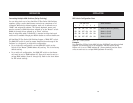
Setting the Switch into Flash Mode
The Switch has four flash DIP switches:
DIP Switch 1–Mouse
DIP Switch 2–Keyboard
DIP Switch 3–Main
DIP Switch 4–Not active
The DIP switch should be set to the “on” position when you are
attempting to update the particular firmware. For instance, set DIP Switch
2 to “on” to update flash keyboard firmware. While updating firmware, no
more than one DIP switch at a time should be set to the “on” position.
USING YOUR KVM SWITCH
20
AutoScan Mode
Pressing the AutoScan button on the Switch will activate the AutoScan
function. In AutoScan mode, the Switch remains on one port for 10
seconds, before switching to the next computer. This time interval cannot
be adjusted.
Note: There is no mouse or keyboard control in AutoScan mode. This is
necessary to prevent data and synchronization errors. If the user is using
the mouse or keyboard when the Switch is switching between ports, data
flow may become interrupted and could result in erratic mouse movement
and/or wrong-character input when using the keyboard.
Press any button on the front panel or any key on the keyboard to
disable AutoScan.
Updating Firmware
To update your firmware, download the appropriate firmware file and
utility from belkin.com. The utility automatically guides you through the
process of updating the firmware on your Switch.
WARNING: We strongly recommend that you update your firmware only if
you are currently experiencing mouse and keyboard problems on your
Switch. Please contact Belkin Tech Support if you need assistance.
To update the firmware, you will need the following items:
1. A separate computer running Windows XP, 2000, NT, Me, 98, or 95.
This computer must not be connected to the CPU ports on the Switch.
2. An available parallel port on the computer.
3. A custom flash cable (DB25 male-to-RJ45, included with purchase)
that connects the Switch and the computer.
4. Firmware update files.