


F5U302
Belkin Tech Support
US: 800-223-5546, ext. 2263
310-898-1100, ext. 2263
UK: 0845 607 77 87
Australia: 1800 235 546
New Zealand: 0800 235 546
Singapore: 65 64857620
Europe: www.belkin.com/support
© 2007 Belkin International, Inc. All rights reserved. All trade names are registered trademarks
of respective manufacturers listed. Windows Vista is either a registered trademark or
trademark of Microsoft Corporation in the United States and/or other countries. P75428-A
Wireless USB Hub
Start Here
Quick Installation Guide
Wireless USB Hub
This guide will lead you through the basic steps
needed to install the Belkin Wireless USB Hub.
For further information or greater detail regarding
installation, please refer to the Belkin User Manual for
this product.
Setup for Windows Vista Users 5 Setup for Windows Vista Users 6
1. Insert the Belkin driver-installation CD into your CD-ROM drive. After a few
moments, the setup application should appear on your computer screen.
Note: If the setup application does not appear, double-click “My
Computer”, and then click your CD-drive icon. This will load the
setup-applications main page.
2. Click “Install driver” and follow the prompts to complete the
software-install process.
3. Double-click the “Wireless USB Control Center” icon found in the
Windows system tray, found at the bottom-right corner of the
Windows desktop.
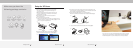
4. a. Connect the power supply to the Hub.
b. Attach the mini-USB cable to the mini-USB port on the side of the Hub
and the other end to your computer’s built-in USB port (Fig. 1). This will
allow your computer to recognize the Hub.
5. Wait approximately one minute for security to become enabled. A
prompt will indicate that the security setup is complete (Fig. 2).
Fig. 2
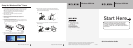
6. Once this process is complete, connect the Wireless USB Adapter
to your computer’s USB port. Windows will automatically find and load
drivers to complete installation (Fig. 3).
Fig. 3
7. You can now plug your USB devices into the Hub and access them
wirelessly (Fig. 4).
Setup for Windows Vista
™
Users
(A)
Connect the
power supply
(B)
Connect
mini-USB cable
Fig. 1
Fig. 4
Up to 30 ft. in the same room
Laptop setup or desktop