


Page 5
8. Adjust the leveling screws until the insert is flush.
Install the insert plate and adjust the leveling screws until
the plate is flush with router top. Fine adjust the six screws
at the four corners of the insert opening first.
7
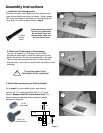
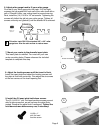
7. Mount your router to the phenolic insert plate.
This insert plate is undrilled. You must drill your own
router mounting holes. Please reference the included
template to complete this step.
8
9. Install the (2) insert plate hold-down screws.
The (2) 1/4-20 x 1" phil. flat head machine screws prevent
side to side movement, as well as keep the plate firmly
seated. Readjust the plate flush if necessary. Tighten the
hold-down screws before every use, if necessary!
9
1/4-20 x 1"
phil. flat head
machine screw
Router not included!
6
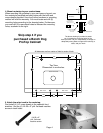
6. Adjust miter gauge track to fit your miter gauge.
First test fit your miter gauge into the track. If it's too tight,
squeeze the gib against the front wall of the miter track with a
pair of Channel Locks, use a shop towel to prevent marring.
Next, install the (14) 1/4-28 x 1/2" set screws. Tightening the
screws will deflect the gib into your miter gauge. Tighten all
screws uniformly and gradually until the desired fit is achieved.
S
Q
U
E
E
Z
E
TO LOOSEN
1/4-28 x1/2"
set screw
This miter track ONLY fits standard 3/8" x 3/4" miter
gauge bars. Wax the slot and bar to reduce wear.
front
wall
gib
Page 5