


724-746-5500 | blackbox.com
10/100BASE-TX Ethernet over Coax Extender
Page 12
3. Installation
3.1 Selecting a Site for the Equipment
CAUTION: Before you install the switch, we strongly recommend that you:
1. Place the extender within an appropriate ventilation environment. Allow at least
1" (2.5 cm) of space around the unit.
2. Position the extender and the relevant components away from sources of
electrical noise such as radios, transmitters, and broadband amplifiers.
3. Place the extender away from environments beyond the recommended moisture
specifcation (10–90% humidity).
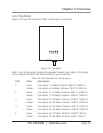
3.2 Desktop Installation
1. Install the extender on a level surface that can support the weight of the unit and
the relevant components.
2. Plug the female end of the provided power cord to the extender and plug the
male end to the power outlet.
3.3 Rackmount Installation
To mount the switch in a rack:
1. Disconnect all the cables from the extender.
2. Place the unit right-side-up on a hard, flat surface with the front facing you.
3. Place a mounting bracket (not included) over the mounting holes on one side of
the unit.
4. Insert the screws and fully tighten with a screwdriver.
5. Repeat the two previous steps for the other side of the unit.
6. Insert the unit into the rack and secure with screws (not included).
7. Reconnect all the cables.
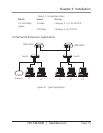
3.4 Installing Network Cables
1. Use crossover or straight-through cable to connect the switch with PCs,
other switches, hubs, and/or routers. All the ports on the extender support
Auto-MDI/MDI-X.
2. Use CAT3, 4, 5, or 5e UTP/STP cables to make a valid connection and obtain
optimal performance. Table 3-1 lists what cables work with each network speed.