


6
ENGLISH
(Original instructions)
Electrical safety
This product must be earthed. Always check that
the power supply corresponds to the voltage on
the rating plate.
Power plugs must match the outlet. Never modify the plug in
any way. Unmodied plugs and matching outlets will reduce
the risk of electric shock.
Extension cables & class 1 product
u A 3 core cable must be used as your appliance is earthed
and of class 1 construction.
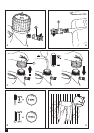
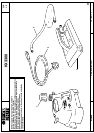
Features
1. Boiler carrying handle
2. Pressure relief valve
3. Boiler reservoir
4. Water level indication
5. Hose
6. Steam plate
7. Filler cap
Assembly
Fitting the hose (g. A and B)
u Screw one end of the hose (5) to the hose connector on
the boiler tank. Check that the hose has been connected
properly.
u Connect the other end of the hose (5) to the steam plate.
Check that the hose has been connected properly.
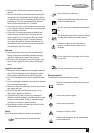
Use
Surfaces may become hot in use. The ller cap
may be hot during use and during the cool down
period.
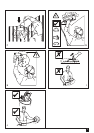
Initial lling of the boiler reservoir (g. C)
Warning! Make sure that the appliance is unplugged.
u Unscrew and remove the ller cap (7).
Note: When lling the boiler, use clean tap water only.
u Fill the boiler reservoir (3) with water. Do not overll the
reservoir past the MAX indicator (maximum 4 litres).
u Replace the boiler ller cap (7), do not overtighten.
u Plug the mains plug into the power supply.
Reaching temperature (g. D)
u Depending upon the temperature of the water used to ll
the reservoir (3), the appliance will take between 6 and 11
minutes to start producing steam.
Relling the boiler reservoir
u Disconnect the appliance from the mains supply.
u Wait at least 2 minutes for the water to cool and the pres-
sure to decrease before removing the boiler ller cap (7).
Warning! The ller cap may be hot during use and during the
cool down period.
u Unscrew and remove the ller cap (7).
u Fill the boiler reservoir (3) with clean tap water. Do not
overll the reservoir past the MAX indicator (maximum 4
litres).
u Replace the boiler ller cap (7), do not overtighten.
u Plug the mains plug into the power supply.
Using the wallpaper stripper (g. E)
u Check the state of your plaster before you start work
as high temperature steam can loosen weak, porous or
poorly bonded plaster. Plaster is also loosened more read-
ily in areas of cracks, holes or if the steam plate is held in
one position for too long.
u You may be able to detect if you have weak plaster by
tapping a few areas of the walls with your knuckles. If this
produces a hollow sound, we recommend proceeding only
with extreme care.
u In all cases test out the wallpaper stripper on a small area,
about 100 cm2 , before starting work properly.
u If at any stage nishing plaster is loosened or you hear a
crack, do not continue. The wallpaper stripper is safe for
drywall/plaster board surfaces.
u Due to the heat generated by this product, it is possible
that certain surfaces, ie. carpets, soft furniture, table tops,
cabinets etc., could be marked or damaged. To prevent
this, ensure a wooden board or other barrier is placed
under the boiler to prevent the heat damaging the surface.
Dust sheets or newspapers are not adequate for this
purpose.
u For best results, remove wallpaper with a scraper. Scrape
off wallpaper in a downward direction (g. F).
u Always wear protection when removing wallpaper from the
ceiling. Be careful of condensation collecting in the steam
plate as hot water may drip (g. G and H). Empty the
steam plate regularly and never use directly above your
head.
u Always place the steam plate in a suitable container when
left unattended, even for a few seconds, and keep the
steam plate facing away from you when in use (g. I and
J).
Storage
u Allow the appliance to cool for at least 10 minutes.
u Empty the appliance.
u Store the appliance upright in a dry place.