


4
S19-220HFP Installation
8/9/07 Bradley Corporation • 215-158HFP Rev. J; EN 07-519
Installation Instructions
Supplies Required:
• (2) 1/4" wall fasteners and bolts
• Pipe sealant
• Piping to 1/2" IPS water supply inlet and piping to 1-1/4" IPS drain outlet
• Sign-mounting hardware
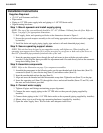
Step 1: Mount eyewash and install supply piping
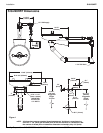
NOTE: The top of the eyewash heads should be 33"–45" (838mm–1143mm) from the floor. Refer to
Figure 1 on page 3 for appropriate dimensions.
1. Drill supply, drain, and operating rod holes at the dimensions shown in Figure 1.
2. Secure the eyewash receptor assembly to the wall using appropriate wall anchors and bolts (supplied
by installer).
3. Install the drain and supply piping (a
pply pipe sealant to all male-threaded pipe joints).
Step 2: Secure operating support sleeve
NOTE: This unit has been designed to accommodate varying wall thicknesses. When installing the
operating stem support sleeve (Item 19) it will be necessary to cut off one or both ends of the sleeve so
that 5/8" of threaded pipe protrudes from both sides of the wall.
1. Insert the operating support sleeve through the wall and secure in place with the nuts and washers
provided.
A slip joint has been provided for adjustment and is located directly below the automatic
weep drain fitting (Item 11).
Step 3: Assemble components
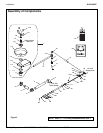
NOTE: Refer to the illustration on page 5 for component assemblies.
1. Assemble the components in the following order over the non-threaded end of the brass tube (Item 12):
connector kit (Item 13), brass friction ring (Item 15) and rubber washer (Item 14).
2. Insert the non-threaded end into the pipe (Item 8).
3. Align and screw the threaded end into the automatic weep drain. Tighten the nut (Item 13) on the pipe.
4. Insert the operating rod (Item 22) through the sleeve and attach handles (Items 23 and 24) with
the nuts and lockwashers provided.
Step 4: Connect water supply
1. Tighten all pipes and fittings maintaining proper alignment.
2. Connect the water supply piping to the 1/2" IPS inlet on the eyewash (piping supplied by
installer).
3. Connect drain piping to the 1-1/4" IPS drain outlet on the eyewash (piping supplied by installer).
4. Mount safety sign to wall using sign mounting hardware (supplied by installer).
5. Open the water supply lines. Test for leaks and adequate water flow.