


4
4
1
1
2
2
3
3
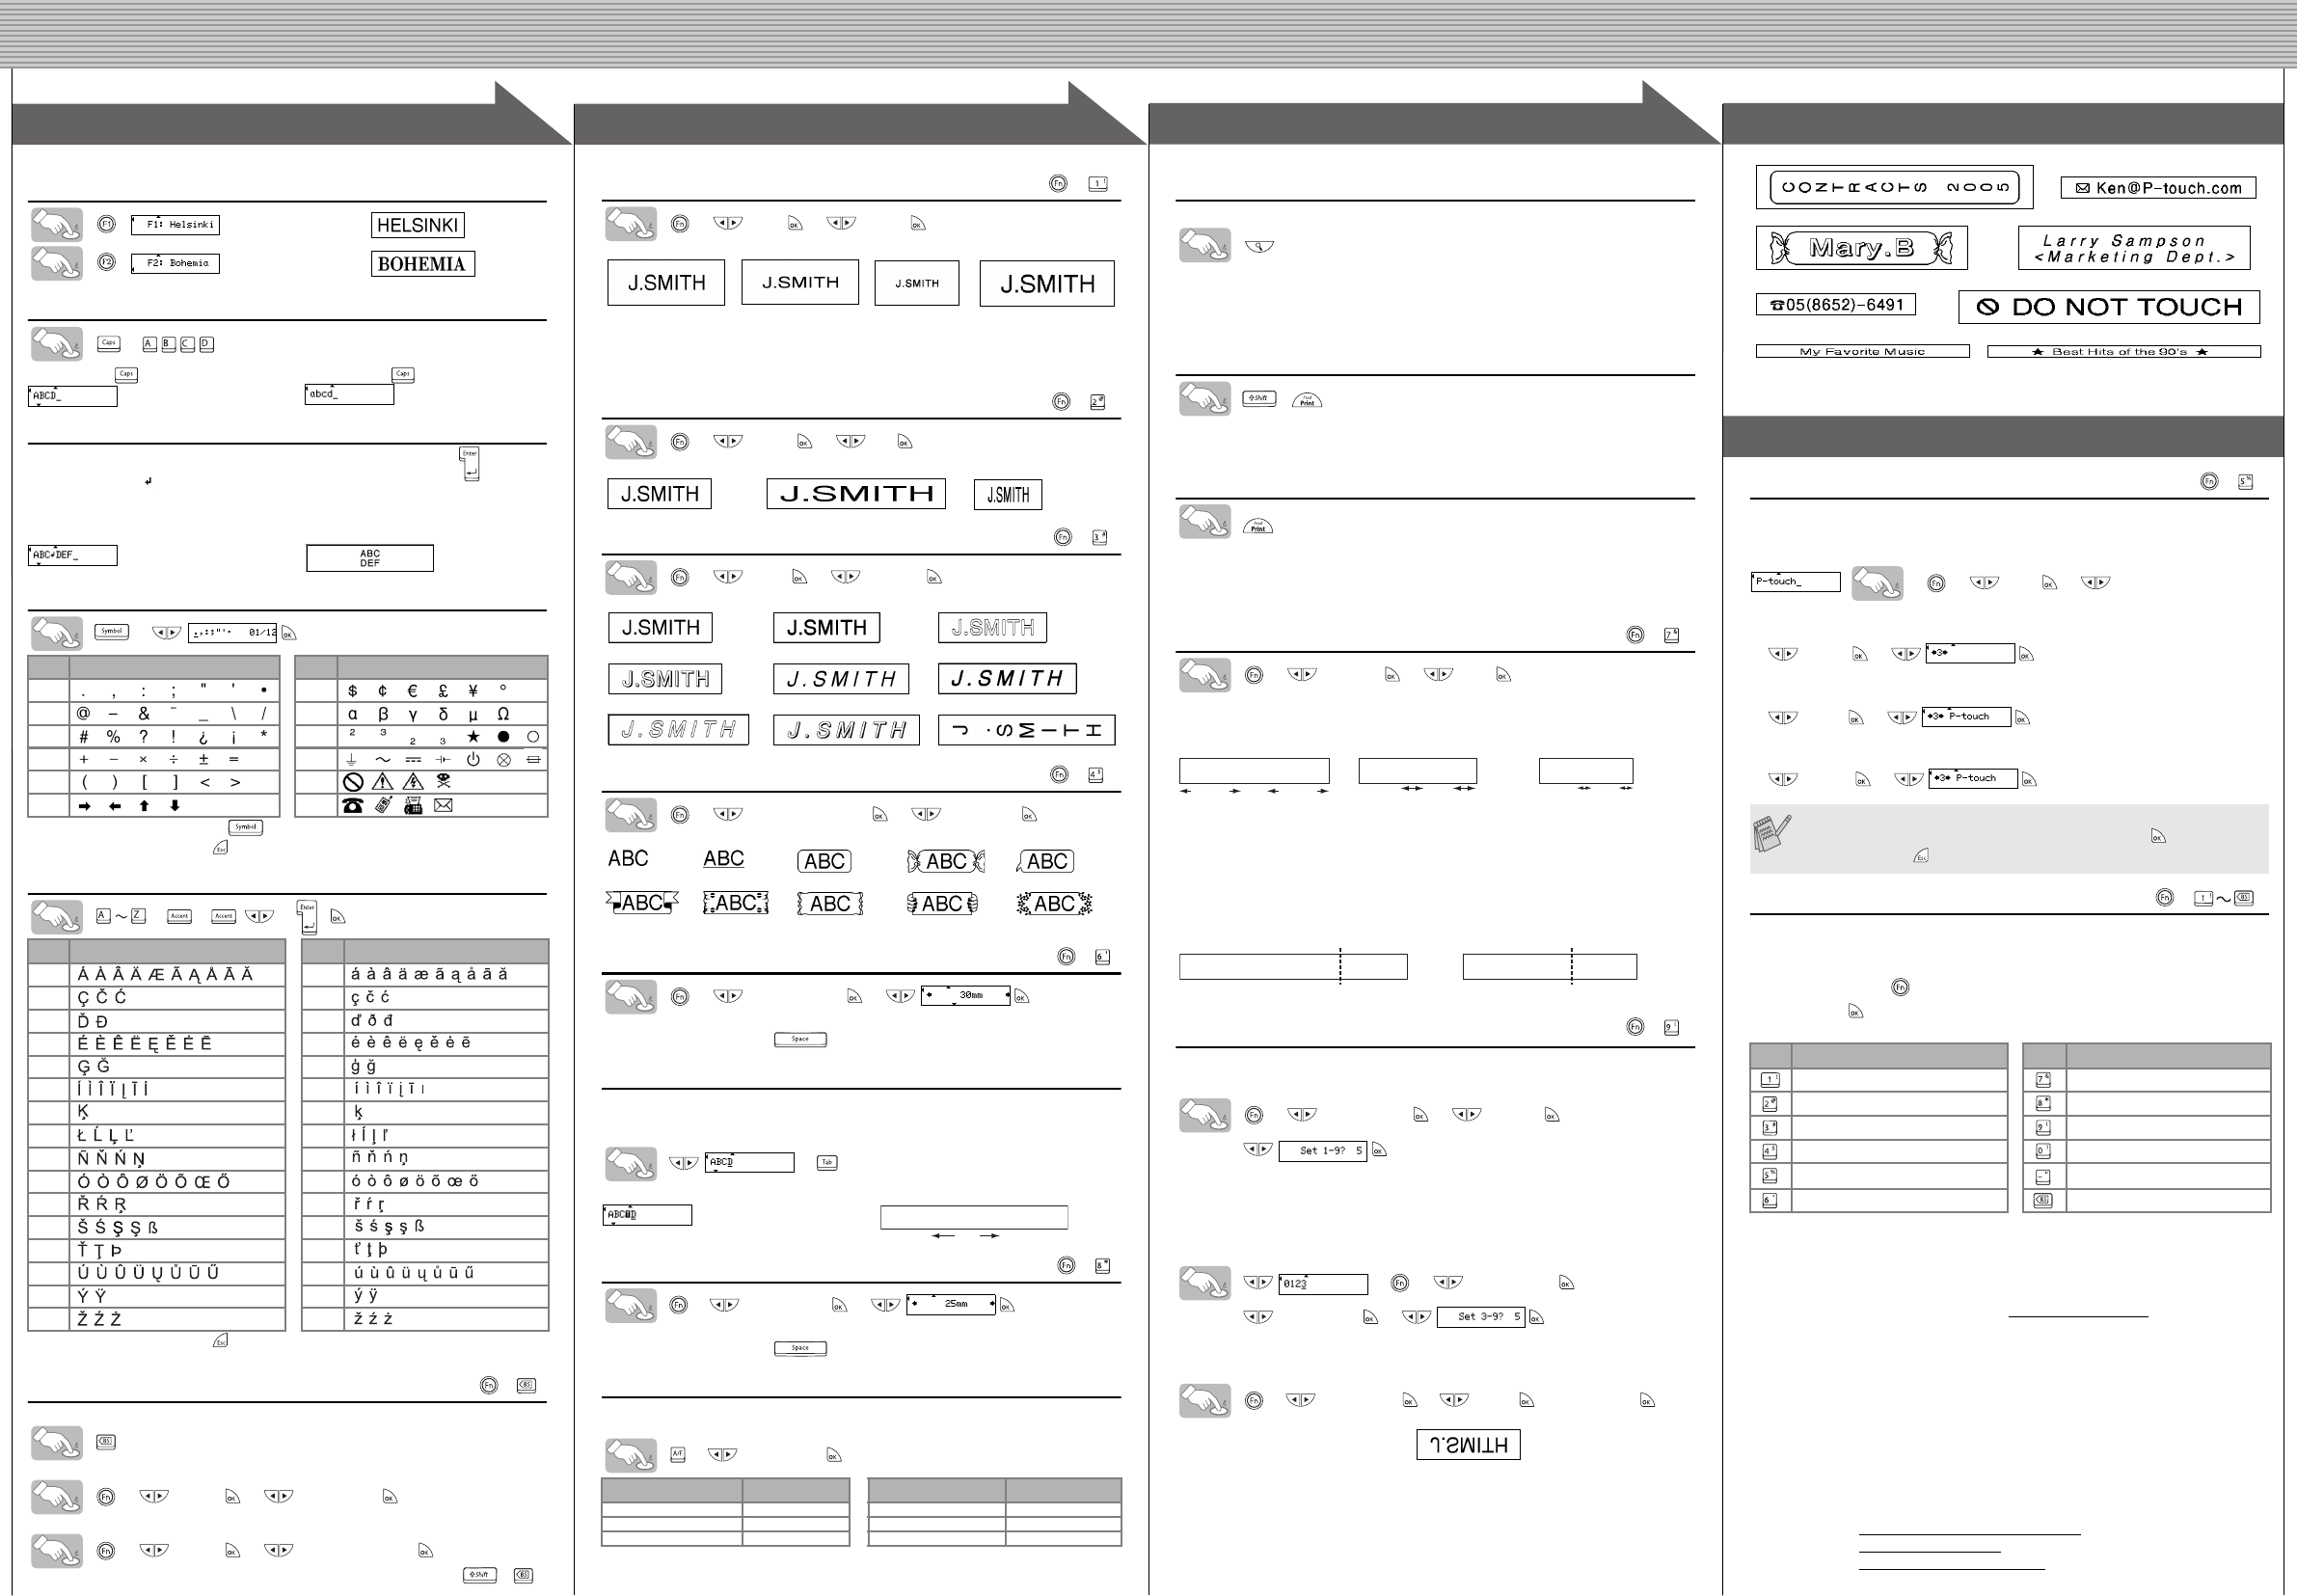
Setting Font
image
image
Switching Upper Case/Lower Case
>
Making Two Line Text
Move the cursor to where the second line starts and press .
The return mark ( ) appears in the text to indicate the end of
the first line and the beginning of the second.
Use either 9 mm, 12 mm, or 18 mm wide tape for two line text.
Entering Symbols
>
• To go to the next group, press .
• To cancel operations, press .
Entering Accented Characters
>>/ > /
• To cancel operations, press .
• The order of accented characters differ by the selected LCD language.
To Clear
To delete a character one by one
To delete all text
> [Clear] > [Text Only]
To delete all text & format
> [Clear] > [Text & Format]
You can also go into [Text & Format] / [Text Only] by pressing + .
Group
Symbols
Group
Symbols
17
28
39
410
511
612
Accented Characters Accented Characters
Aa
Cc
Dd
Ee
Gg
Ii
Kk
Ll
Nn
Oo
Rr
Ss
Tt
Uu
Yy
Zz
Upper case ( ON) Lower case ( OFF)
Display Label image
(+)
Setting [Size]
> [Size] > [Large]
Automatically adjusts the text size according to the tape width.
Select MAX to print with maximum text size when using 18 mm tape, all texts
are in upper case, the Style setting is [Normal], and the Underline/Frame set-
ting is [Off].
Setting [Width]
> [Width] > [×2]
Setting [Style] (Vertical)
> [Style] > [Vertical]
Setting [Underline/Frame]
> [Underline/Frame] > [Underline]
Frames cannot be printed on 3.5 mm tape.
Setting [Label Length]
(Auto / 30 - 300mm)
> [Label Length] >
• You can also select the length by entering the length with Num keys.
• To return to [Auto], press .
Setting [Tab]
You can make aligned texts by setting tabs.
Example: To set a tab between "ABC" and "D"
The cursor should be positioned where you set a tab.
>
Setting [Tab Length]
(Auto / 0 - 100mm)
> [Tab Length] >
• You can also select the length by entering the length with Num keys.
• To return to [Auto], press .
Setting [Auto Format]
You can choose label length from six formats to create labels for various ap-
plications.
> [VHS Spine]
Text Preview
You can preview the text before printing.
• The LCD shows the whole text and the label length (mm/inch), then returns to the
original text.
• Only the text can be previewed, not the font, style, size, underline/frame or any
additional features.
Feeding (Tape Feed)
+
• The machine will feed 25 mm of tape, which may be needed when installing a new
tape cassette or when using the [Chain Print] feature.
Printing
• To cut off the label, push in the tape cutter lever on the upper-left corner of the
machine.
• To prevent damage to the tape, do not try to cut while the message "Print" or "Feed"
is displayed.
Setting [Margin] (Tape Margin)
> [Margin] > [Full]
[Full]/[Half]/[Narrow] is for leaving equal margins on both sides of the text.
NOTE: Cut along the printed dots (:) with scissors so the text is centered in the label.
[Chain Print] is for printing more than 1 copy of a label with minimum margin
<e.g. 1>. You can also create a label containing text in various styles; print a
text in one style, and before feeding, enter the second text in another style
<e.g. 2>. FEED THE TAPE BEFORE USING THE CUTTER (see Feeding/
Printing). Otherwise A PART OF THE TEXT MAY BE CUT OFF. Do not try to
pull the tape since this may damage the tape cassette.
Using [Print Option]
[Copies]
You can print up to 9 copies of each label.
> [Print Option] > [Copies] >
You can also select the number of copies by entering with Num keys.
[Numbering]
You can print many copies of the same text while increasing a selected
number by 1 after each label is printed.
Example: To print copies of a label containing a serial number (0123, 0124 and 0125)
>>
[Print Option] >
[Numbering] >
Select the highest number you wish to be printed when setting the number.
[Mirror]
>
[
Print Option
]
>
[
Mirror
]
>
[Mirror Print?]
Use a clear tape in [Mirror], so the labels can be read correctly from the op-
posite side when attached on glass, windows or other transparent surfaces.
Peel the printed label from backing and apply the label.
Memory (File)
You can save your original labels on to your machine. Up to five labels can
be saved and recalled for printing whenever you desire. You can also edit and
overwrite the stored label.
>> [File] >>
To Save:
> [Save] >
To Print:
> [Print] >
To Open:
> [Open] >
Function Shortcuts
In addition to the basic steps to search for a function, the PT-1880 provides
you with function shortcuts so you can easily jump to a frequently used func-
tion just by pressing and the shortcut key shown in the table below. To
confirm, press .
For Australia Only:
Warranty & Repair - For details about warranty on your Brother Product, the
details are listed on the following link: www.brother.com.au
under warranty.
For warranty service (repair) of your Brother product you will need to retain a
copy of your sales docket and contact the Support Centre for location of near-
est Authorised Warranty Centre (AWC).
Support - For technical support for your Brother Product other than what you
can resolve through the User's Guide, please visit our website or our solutions
website for FAQs/Troubleshooting or contact the Product Support Centre for
any technical or customer care/support enquiry.
Brother International (Aust) Pty Ltd
Phone: 02 8875 6000
Fax: 02 9870 7223
Email: productsupport@brother.com.au
Web Site: www.brother.com.au
Solutions Site: http://solutions.brother.com
[Large] [Medium] [Small] [MAX]
[Normal] [
×2] [×1/2]
[Normal] [Bold] [Outline]
[Shadow] [Italic] [Italic Bold]
[Italic Outl](Italic Outline)
[Italic Shadow] [Vertical]
[Off] [Underline] [Round] [Candy] [Callout]
[Banner] [Wooden] [Vine] [Hand] [Flower]
Application Length Application Length
VHS Spine 140 mm CD Case Spine 113 mm
MiniDV Spine 42 mm File Tab 82 mm
Audio Tape 89 mm Divider Tab 42 mm
(+)
(+)
(+)
(+)
(+)
Display Label image
ABC D
Tab
(+)
(+)
ABC ABC: ABC:
25mm 25mm
12mm 12mm
4mm4mm
Full Half Narrow
ABC ABC ABC ABC
ABC
DEF
<e.g. 1> <e.g. 2>
(feed & cut) (feed & cut)
Chain Print
(+)
If you try to store a label when there is already a label stored to that
number, a message "Overwrite?" will appear. Press to save your
new label. Press to cancel.
Key Function Key Function
[Size] [Margin]
[Width] [Tab Length]
[Style] [Print Option]
[Underline/Frame] [Language]
[File] [Unit]
[Label Length] [Clear]
(+)
(+ )
[CREATING LABELS]
MAKING TEXT
DESIGNING LABELS
PRINTING LABELS COMPLETED LABELS
USEFUL FUNCTIONS