


Operation Guide DQR-100U
4
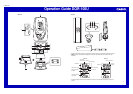
USING THE LIGHT
Pressing the SNOOZE/LIGHT button (1) turns on the light and illuminates the display for easy reading in the
dark.
Important!
• Overuse of the light can shorten battery life.
BATTERY REPLACEMENT
Low Battery Warning
A indicator appears on the display to let you know when battery power is low. Replace the batteries as soon
as possible.
Note that the indicator appears on both the main unit and sub-unit when sub-unit battery power goes low.
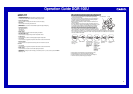
To replace main unit batteries
Replace batteries whenever the display of the clock becomes dim and difficult to read.
1. Open the battery compartment cover as shown in the illustration.
2. Remove all of the old batteries.
3. Load a full set of new batteries. Make sure that their positive (+) and negative (–) ends face in the correct
directions. If you load batteries incorrectly, they can burst and damage the clock.
4. Replace the battery compartment cover.
5. Press the RESET button (6). Be sure to press the RESET button (6) after replacing batteries.
To replace sub-unit batteries
1. Rotate the battery compartment cover from LOCK to OPEN.
2. Remove both old batteries.
3. Load new batteries. Make sure that their positive (+) and negative (–) ends face in the correct directions. If you
load batteries incorrectly, they can burst and damage the clock.
4. Replace the battery compartment cover.
5. Press the RESET button (B). Be sure to press the RESET button (B) after replacing batteries.
6. Press the RE-SYNC button (0).
Battery precautions
• Keep batteries out of the reach of small children. If a battery is accidentally swallowed, contact your physician
immediately.
• Be sure to load the batteries with their positive (+) and negative (–) ends facing correctly.
• Never mix old and new batteries, or batteries of different brands.
• Never charge the batteries that come with the clock.
• Should batteries ever leak while in the clock, wipe out the fluid with a cloth, taking care not to let any get onto
your skin.
• Replace the batteries at least once a year, even if the current batteries are working properly.
• The batteries that come with the clock lose some of their power during transport and storage.
THERMOMETER FUNCTIONS
Both the main unit and the sub-unit are equipped with their own temperature sensors. Temperature data measured
by the sub-unit is sent by wireless transfer to the main unit. This makes it possible to view both the indoor and
outdoor temperature on the main unit display.
Temperature Measurements
• Both the main unit and the sub-unit take temperature measurements every 16 seconds.
• The temperature display shows “LO” for temperatures below –50°C (–58°F) and “HI” for temperatures above
70°C (158°F).
• Though temperature readings are displayed up to 0°C (32°F) and greater than 41°C (105°F), note that such
readings are actually outside the guaranteed temperature range of this clock.
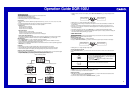
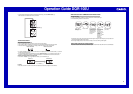
Switching between Celsius and Fahrenheit
• Push the °C/ °F button (9) to select either Celsius (°C) or Fahrenheit (°F).
Celsius (°C) Fahrenheit (°F)
°C/ °F button (9)
°C °F
°F°C
Main unit
(INDOOR)
Sub-unit
(OUTDOOR)
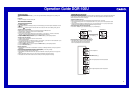
High Temperature and Low Temperature Memory
• The following data is stored in memory automatically.
Main unit high temperature and low temperature
Sub-unit high temperature and low temperature
Current temperature
MAX/MIN TEMP. button (7)
Main unit high temperature and low temperature
Sub-unit high temperature and low temperature