Quick Start Guide
PCR-T285
PCR-T295
SE-S100
Electronic Cash Register
Note : This manual describes basic setups and operation methods. For more detail, please
download the User’s Manual from: http://world.casio.com/manual/sa/
Thank you very much for purchasing this CASIO electronic Cash Register.
START-UP is QUICK and EASY!
Power Supply
Your Cash Register is designed to operate on standard household current (120 V, 220 V, 230 V, 240 V;
50/60 Hz). Do not overload the outlet by plugging in too many appliances.
Cleaning
Clean the Cash Register exterior with a soft cloth which has been moistened with a solution of a mild
neutral detergent and water, and wrung out. Be sure that the cloth is thoroughly wrung out to avoid
damage to the printer. Never use paint thinner, benzene, or other volatile solvents.
The mains plug on this equipment must be used to disconnect mains power. Please ensure that the
socket outlet is installed near the equipment and shall be easily accessible.
Preparations
Please follow the steps described below.
• Unpack the Cash Register and DO NOT plug into the mains supply until sections 1 and 2 have been
completed.
• To prevent losing all your settings and sales data, we strongly recommend that you install the memory
protection batteries before you use the Cash Register and replace them at least once a year.
MA1411-A QSG286US*E
To use the Cash Register safely
*
Warning Power plug and AC outlet
+
+
+
-
• Use only a proper AC electric outlet. Use of an outlet with a different voltage from the rating
creates the danger of malfunction, re, and electric shock. Overloading an electric outlet
creates the danger of overheating and re.
• Make sure the power plug is inserted as far as it will go. Loose plugs create the danger of
electric shock, overheating, and re.
Do not use the register if the plug is damaged. Never connect to a power outlet that is
loose.
• Use a dry cloth to periodically wipe off any dust built up on the prongs of the plug. Humidity
can cause poor insulation and create the danger of electric shock and re if dust stays on
the prongs.
• Do not allow the power cord or plug to become damaged, and never try to modify them in
any way. Continued use of a damaged power cord can cause deterioration of the insulation,
exposure of internal wiring, and short circuit, which creates the danger of electric shock
and re.
Contact CASIO service representative whenever the power cord or plug requires repair or
maintenance.
Manufacturer:CASIO COMPUTER CO., LTD.
6-2, Hon-machi 1-chome, Shibuya-ku, Tokyo 151-8543, Japan
Responsible within the European Union:CASIO EUROPE GmbH
CASIO-Platz 1, 22848 Norderstedt, Germany
The main plug on this equipment must be used to disconnect mains power.
Please ensure that the socket outlet is installed near the equipment and shall be easily accessible.
WARNING
THIS IS A CLASS A PRODUCT. IN A DOMESTIC ENVIRONMENT THIS PRODUCT MAY CAUSE RADIO INTERFER-
ENCE IN WHICH CASE THE USER MAY BE REQUIRED TO TAKE ADEQUATE MEASURES.
FCC WARNING: Changes or modifications not expressly approved by the party responsible for compliance
could void the user’s authority to operate the equipment.
WARNING: This equipment has been tested and found to comply with the limits for a Class A digital device,
pursuant to Part 15 of the FCC Rules. These limits are designed to provide reasonable protection against
harmful interference when the equipment is operated in a commercial environment. This equipment generates,
uses, and can radiate radio frequency energy and, if not installed and used in accordance with the instruction
manual, may cause harmful interference to radio communications. Operation of this equipment in a residential
area is likely to cause harmful interference in which case the user will be required to correct the interference
at his own expense.
GUIDELINES LAID DOWN BY FCC RULES FOR USE OF THE UNIT IN THE U.S.A.
(Not applicable to other areas)
Please keep all information for future
reference.
The declaration of conformity may be
consulted at http://world.casio.com/
1. Name of Parts
Printer cover
Drawer
Take up reel
Mode switch
Keyboard
Platen arm
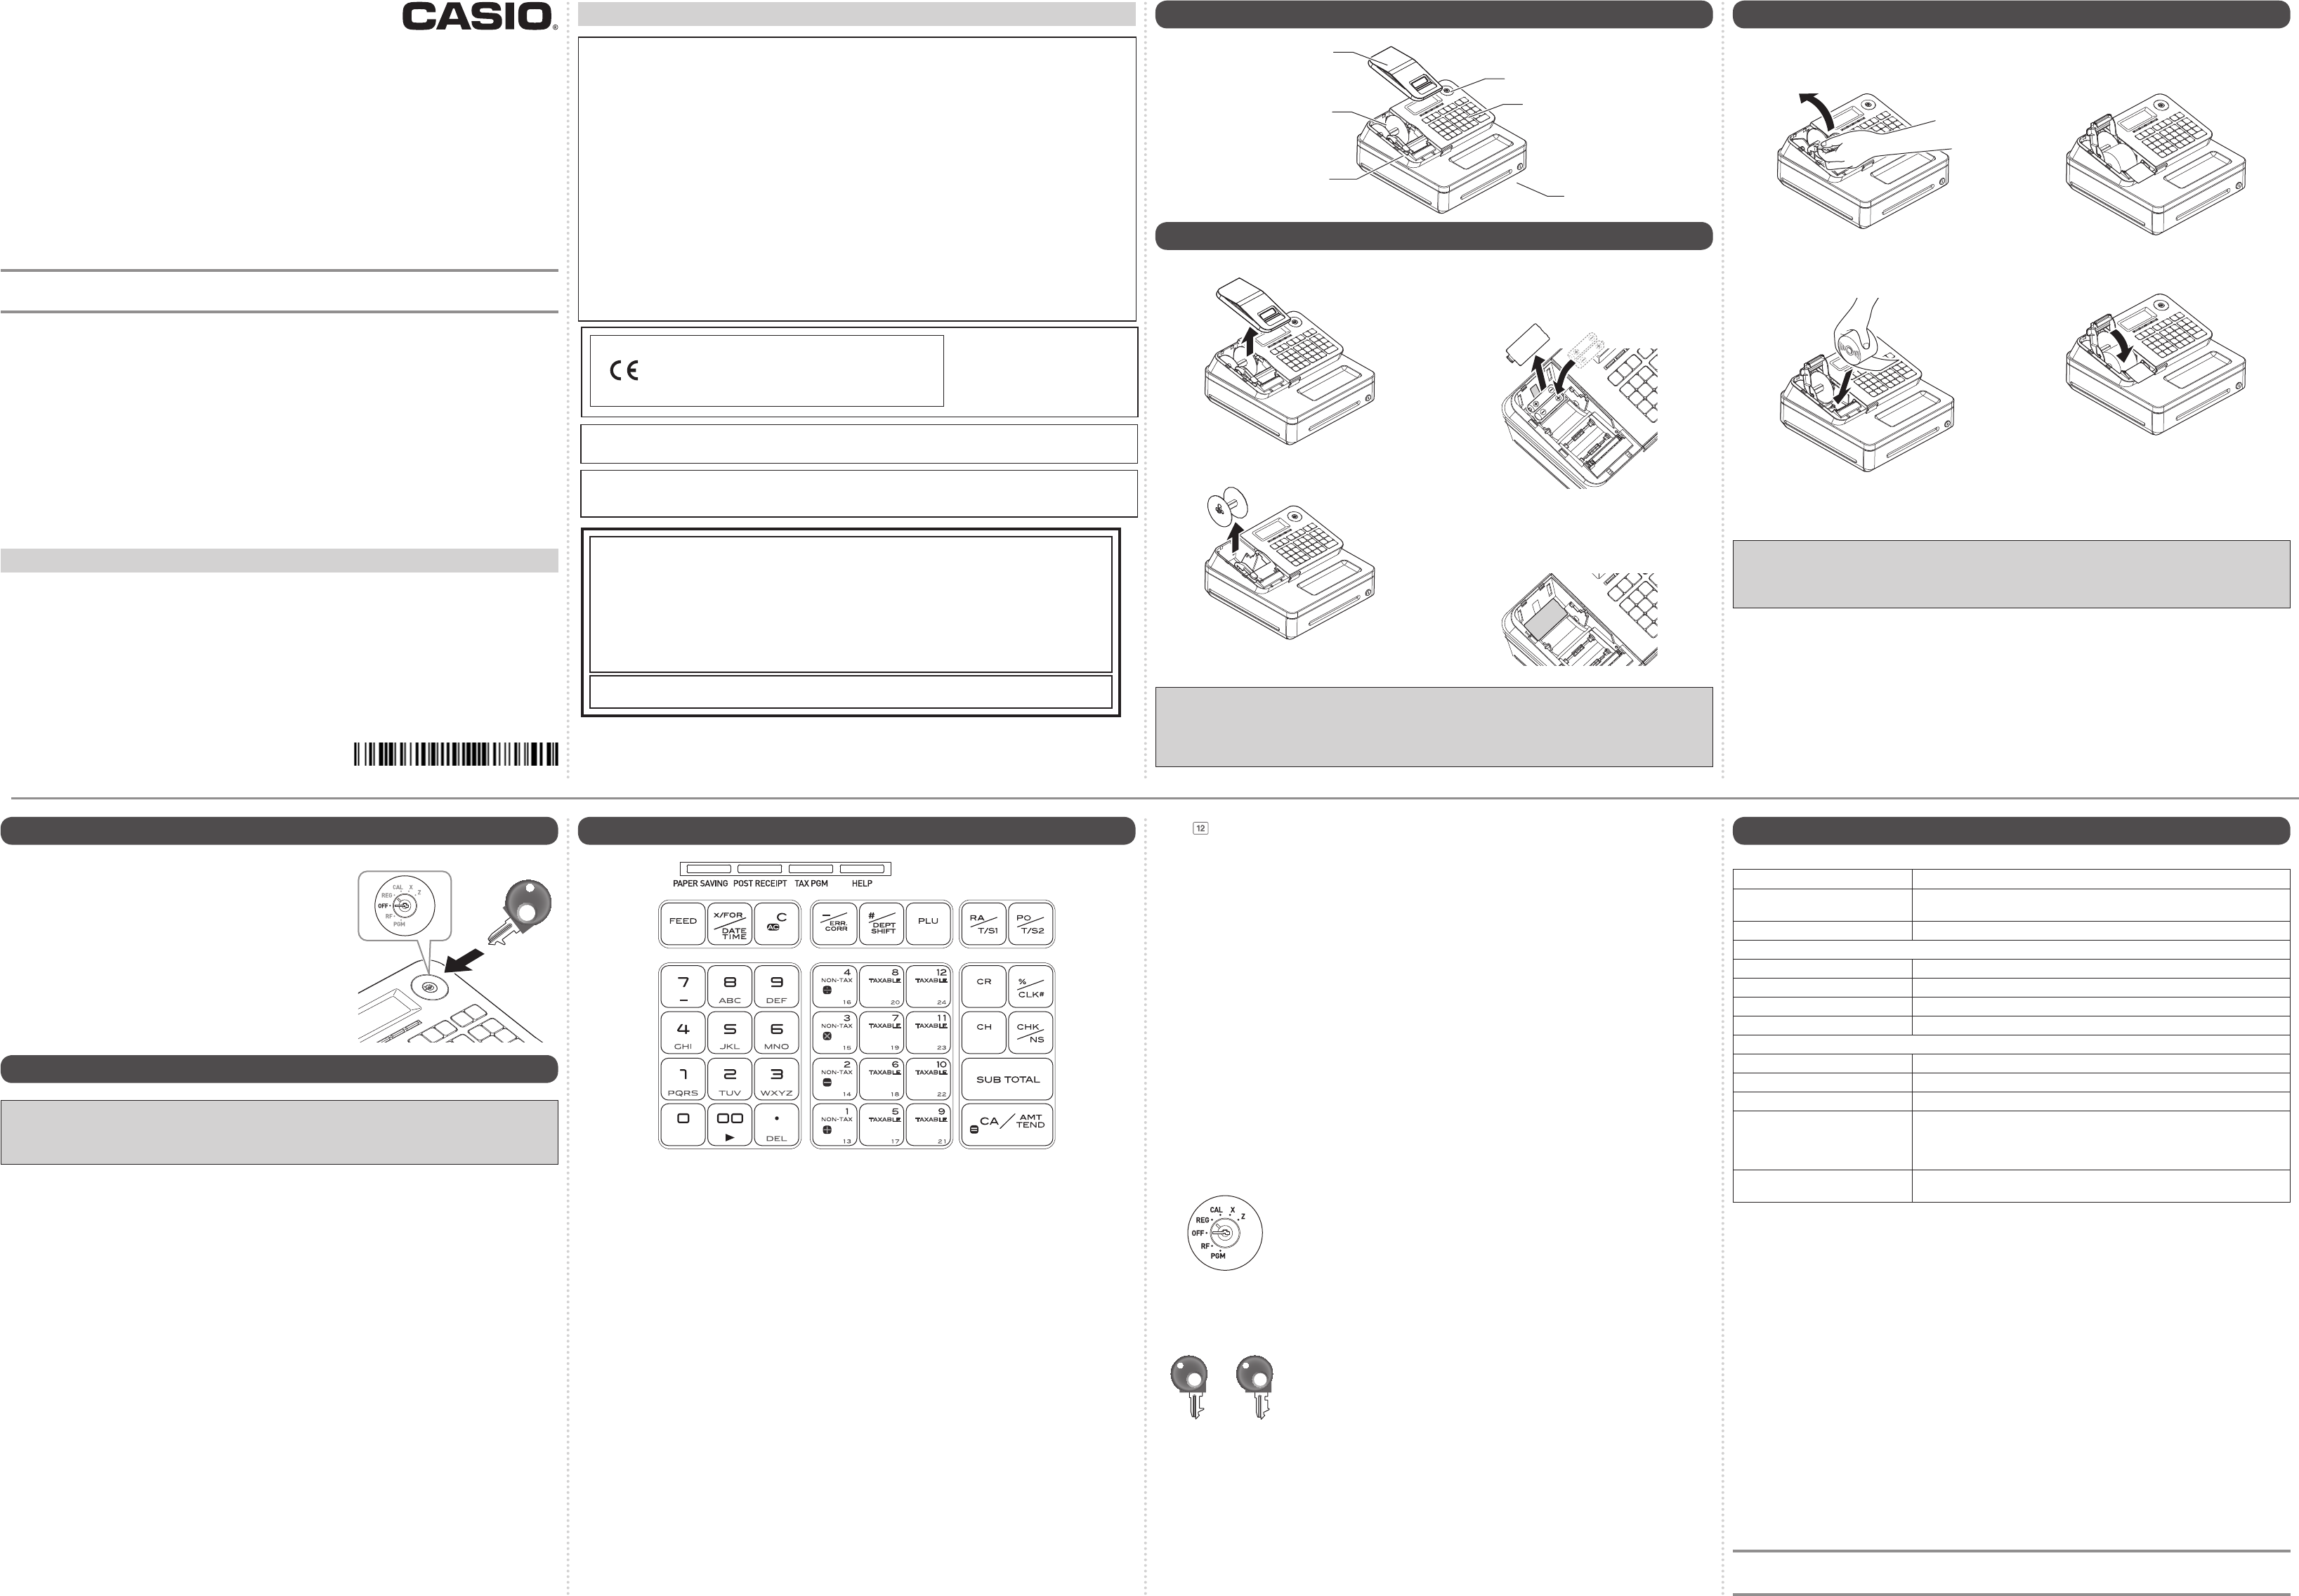
2. To install memory protection batteries
1 Remove the printer cover by lifting it up.
2 Remove the take up reel.
3 Remove the battery compartment cover and
install two new “AA” type manganese batter-
ies in the battery compartment over battery
extraction ribbon.
4 Replace the battery compartment cover.
Please make sure that the battery compart-
ment cover is fastened securely with a click
sound.
Important
• Be sure that the plus (+) and minus (-) ends of the batteries are facing in the directions as indicat-
ed on the battery compartment.
• The Cash Register will show “LOW BATTERY” on the display when the batteries are running low
on power. Install two new batteries when this occurs.
3. To set a paper roll
This Cash Register is tted with a thermal printer - only 58 mm wide thermal paper rolls can be used.
1 Open the platen arm by lifting it up slowly.
2 Hold the paper roll so that the end of the
paper comes out from the bottom of the roll
and place it behind the printer.
3 Place the end of the paper over the printer.
4 Close the platen arm slowly until it locks
securely.
Note:
Never touch the printer’s thermal head and the platen. Avoid the thermal paper from heat,
humidity or direct sunlight.
Important
• If the thermal paper roll is not properly installed, you will not be able to use the Cash Register. The
display shows ‟E014 Paper end” to indicate that the paper is not inserted.
• If the display shows “E010 Close the platen arm”, close the platen arm securely.
4. Get the Cash Register ready
1 Insert a Mode key marked PGM that comes with the Cash
Register in the Mode switch and turn it to OFF position.
2 Plug in the power cord into an AC outlet.
5. To set the language, date, time, and tax rates
Important
• In each setting of date, time and tax rates, the Cash Register prints your settings. Make sure that
the settings are correct. If you have made incorrect date and time setting, press y key . For
other incorrect settings, pull out the AC cord, take out batteries, and start from the beginning.
1 As soon as you plug in the power cord, the printer prints instructions for selecting the language.
Input the language number and press p key. For example, if you wish to select English, press
? p keys.
2 The printer prints the instructions for setting date and time and the top digit of the display ashes.
Enter the date in order of month, day, and year. For example, input 012115 for January 21, 2015. Af-
ter then, display changes for setting time. Enter the present hours and minutes in 24 - hour system.
For example, 1300 for 1:00 pm.
Note: For Canadian model, proceed to step 5.
3 The printer prints “PLEASE INPUT TAX RATE”. Input tax rate 1 and press p. For example,
press M and p keys for 7% tax rate 1.
4 Repeat the same operation as step 3 for tax rates 2 and 3. Please do not forget the rates you have
set, and be sure to preset the rates to departments explained in “To preset tax status to each de-
partment” on the back page. If you wish to exit from the tax rates settings, press o key. For US
model, the basic settings have been completed.
5 Canadian model only: As the printer prints “PLEASE SELECT TAX TABLE.” and list of the states,
choose your state and input the number of the state and press p key. For example, if you use
the Cash Register in Alberta, press Z and p keys.
If you select “MANUAL ENTRY: 0 <CA>”, input tax rates manually by following steps 3 and 4 and
then proceed to step 6.
6 Canadian model only: The printer prints “DO YOU USE CANADIAN ROUNDING?”. Input Z
p (USE: not using 1¢ coins for change) or ? p (NOT USE: using 1¢ coins for change).
PGM
6. Key functions
The followings show the major functions of the keys.
[PAPER SAVING]: Use this key to stop issuing
receipts or compressed
journal printing to save
paper.
[POST RECEIPT]: When the Register is set
to not to print receipts,
pressing this key prints a
receipt of the preceding
transaction.
[TAX PGM]: Use this key to set tax
statuses and tax tables.
[HELP]: Use this key to print
operation guidance.
l: Use this key to feed the
paper roll.
x: Use this key to show
present date and time.
Also this key is used for
multiplications.
y: Use this key to clear an
entry that has not yet been
registered.
g: Use this key to correct
immediately preceding
registration. Also this key
is used for reducing price.
j: Department shift key.
Using this key with
departments 1 to 12 keys,
items are registered in
departments 13 to 24. Also
this key prints preceding
number entry without any
registration.
i: Price look up key. Use this
key to register preset items
by number.
c: Use this key following a
numeric entry to register
money received by non-
sale transactions.
v: Use this key following a
numeric entry to register
money paid out from the
drawer.
? to >"': Ten-key. Use these keys
for numeral entries.
a to
: Department keys. Use
these keys to register
items to the corresponding
department.
c: Use this key for credit card
payments.
:: Use this key for discounts.
Also this key is used to
sign a clerk on or off.
u: Use this key to register
charge sales.
m: Use this key for check
payments. Also this key is
used for opening drawer.
o: Use this key to display and
print the current subtotal
amount.
p: Use this key to register
cash sales.
Mode switch
PGM: Use this position for setups.
RF: Use this position for refunding.
OFF: Use this position to turn the Cash Register off.
REG: Use this position for registrations.
CAL: In the CAL mode, the Cash Register functions as a calculator.
X: Use this position to print the sales report. After the reporting, all the sales
data remain in the memory.
Z: Use this position to print the sales report. After the reporting, all the sales
data is cleared from the memory.
Mode keys
OP
PGM
There are two types of mode keys. The program key marked “PGM” and
the operator key marked “OP”. The program key can set the Mode switch
to any position, while the operator key can select only OFF, REG, and CAL
positions.
7. Specications
Entry 10-key system; Buffer memory 8 keys (2-key roll over)
Main display 20 characters x 1 line
10-digit numeral x 1 line
Customer display Amount 8 digits (zero suppression)
PRINTER
Receipt/Journal Thermal alpha-numeric system 24 digits, receipt on/off key
Paper roll 58 (W) x 80 (D) mm
Paper feed Receipt or Journal
Print speed 10 lines/second max.
Chronological data
Power supply/power consumption See the rating plate.
Operation temperature 0˚C to 40˚C (32˚F to 104˚F)
Humidity 10 to 90%
Dimensions 180 mm (H) × 410 mm (W) × 450 mm (D) (7 3/32”(H) × 16 5/32”(W) × 17
23/32”(D)) with medium size drawer.
167 mm (H) × 326 mm (W) × 345 mm (D) (6 9/16”(H) × 12 27/32”(W) × 13
9/16”(D)) with small size drawer.
Weight 7.3 kg (16.0 lbs.) with medium size drawer
3.3 kg (7.2 lbs.) with small size drawer
Specications and design are subject to change without notice.
You can download “Setting tool” from the following websites.
http://www.casio4business.com/sa/products/index_products.html


