


touching.
· Never use any other type of liquid other than UNSCENTED water based fog fluid.
· Use of any other fluids or additives will void the warranty.
Controlling the F-1050
1. The F-1050 has a fog button located on the top of the unit.
2. FC-4M Timer remote - Remove the thumb screws holding the controller in place and lift out of the well.
Plug the controller into the back of the F-1050 and press the red button to turn on the controller. When the
unit is ready to fog the red light will come on. Press the yellow button to activate the timer functions. The
yellow indicator light will come on. Adjust the duration and interval knobs to achieve the desired effect. The
unit will cycle regularly to the settings. Depress the yellow button again to exit time mode. To use the FC-4
manually, simply depress and hold the green button to generate the desired amount of fog.
3. FC-5 Wireless remote (optional)
4. DMX-3F DMX Adapter (Optional)
Installation / Mounting
The fogger must be used in a horizontal position sitting on a level surface or it may be mounted using the
bracket provided. Ensuring that the fog is not shooting directly at anyone's face. Whatever method of instal-
lation you choose, the fogger must not have more than a 15 degree angle of inclination. We always sug-
gest that for safety purposes use of a suitable hanging clamp and safety cable is essential. CHAUVET
offers a range of items, which are ideal for safe mounting.
Replacing Fuses
If the unit does not function at all when connected to the main power supply then it is highly likely that the
fuse has blown.
Disconnect from main power supply before attempting to replace the fuse.
In order to replace the fuse, disconnect from the main power supply first, and then remove the fuseholder
cover to reveal the fuse. The unit has a label attached which indicates the correct fuse rating and you will
also find this listed as part of the specifications for the unit later in this guide. It is most important that
replacement fuses are of the correct rating. Failure to use the correct fuse could damage the lighting effect
beyond economic repair.
The fuse should simply be placed inside the holder and thecover replaced. When this is done connect to
the main power supply to check. If the unit is still not working then please contact CHAUVET.
Cleaning
Cleaning your fog machine regularly will help reduce costly parts replacement and repair charges.
After every 40 hours of continuous operation or when the machine will be idle for a long time it is recom-
mended to run a cleaning solution composed of 80% distilled water and 20% white vinegar through the
system to prevent the accumulation of particles in the heating element.
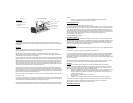
1. While unit is unplugged and cool, unscrew nozzle at very front of unit (fig.1) and clean out debris
with white vinegar and a pipe cleaner, making sure that the hole is free and unobstructed.
2. Empty all fog fluid from the machine and replace with cleaning solution in the tank. Plug unit in
and allow to warm as usual.
3. Run unit in a well ventilated area until tank is empty.
4. Replace nozzle.
5. Cleaning is now complete. Unplug and refill with a quality water based fog fluid once cool.
All fog machines are prone to clogging due to the consistency of fog fluid and the high temperatures at
which it vaporizes. However a well maintained machine should provide years of reliable use.
The body of the unit may be cleaned with a dry cloth. Store dry.
Maintenance & Servicing
Dealer Stamp Model: F-1050 Fog Machine
Introduction
Congratulations on the purchase of your new CHAUVET fog machine. We are confident you will enjoy
many trouble free hours with this unit. To assist with the care and use of the product we have prepared this
short guide.
Operation
Before connecting this unit to the mains power supply for the first time you must first fill the fluid tank with
fog fluid and check that the nozzle is clean and unobstructed.
This fog machine has been designed to function on a mains power supply of either 120V~60Hz or
230V~50Hz and has been fitted with a suitable power plug for use with your local voltage. Check the label
on the unit and the power plug for the correct voltage.
Place the machine on a level surface and loosen the cap of the fluid tank to fill with quality unscented water
based fog fluid. We recommend use of CHAUVET fog fluid as it has been specially formulated for use with
CHAUVET foggers. Plug the remote control unit into the socket at the rear and switch on to allow time to
preheat. The remote control will be found at the rear of the unit. Simply remove the two thumb screws and
remove from the unit. The cable is stored in the well.Once the machine has reached temperature and is
ready to operate the red light on the unit and the remote control will illuminate. Push the button on the unit
or the remote control when lit and hold for prolonged bursts of fog.
Always monitor fog fluid level as running the machine with no fluid could cause permanent damage. The
F-1050 has L.E.D.’s on the front of the unit to monitor the level of fluid. The green L.E.D.’s will light when
there is sufficient fluid. The red L.E.D.’s will flash when the fluid needs replenishing. In order to increase the
life of the F-1050, the unit will not fog when the red L.E.D.’s are flashing. This feature of Chauvet’s will pro-
tect the heater and pump from functioning without fluid.
Please do not touch or place anything in close proximity to the nozzle during operation or preheat as there
is a danger of burns.
It is normal for your fogger to have a recycling period after long bursts when the unit will shut itself down for
a short period in order to heat up to temperature. During this time no fog can be produced. The red light on
the unit and the remote will illuminate when the unit is ready for action again.
Due to the high operating temperature of fog machines it is advised that the effect be used in well ventilat-
ed areas taking care not to obstruct the air vents. After use, allow time to 'cool' for safety before moving or
• Fog Fluid Tank
• Eyebolt for Safety Cable
• Manual Fog Button
• Ready to Fog Lamp
• Fluid Level Indicator
• Fog Output Nozzle
On the Rear
• Remote Control and Cable
• Socket for Remote Control
• On/Off Switch
• Power Cord Socket and Fuse holder