


46
APPENDIX
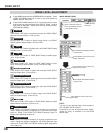
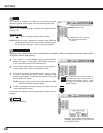
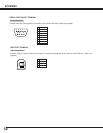
Check number of lamp to be replaced on Lamp Status Display.
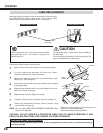
Remove two screws on Lamp Cover and press button to open
Lamp Cover. (See right figure.)
1
3
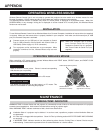
Loosen two screws and pull out Lamp Assembly to be replaced
by grasping handle.
4
Turn off a projector and disconnect AC Power Cord. Allow a
projector to cool down for at least 45 minutes.
2
Replace Lamp Assembly with a new one and tighten two screws.
Make sure Lamp is set properly
6
Follow these steps to replace lamp assembly.
Replace Lamp Cover and tighten two screws.
5
7
8
Connect AC Power Cord to a projector and turn a projector on.
Reset Lamp Replacement Counter. (Refer to section "Lamp
Counter Reset" on page 42.)
NOTE : Do not reset LAMP REPLACEMENT COUNTER when
lamp is not replaced.
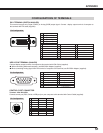
BUTTON
SCREWS
LAMP
COVER
SCREWS
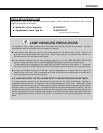
Make sure which number of lamp needs to be
replaced on Lamp Status Display.
Figure shows case of replacing LAMP 2.
LAMP 1
LAMP 2
LAMP 3
LAMP 4
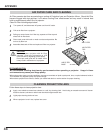
CAUTION : DO NOT OPERATE A PROJECTOR WHILE ANY OF LAMPS IS REMOVED. IT MAY
RESULT IN MALFUNCTIONS, FIRE HAZARD, OR OTHER ACCIDENTS.
NOTES ON LAMP REPLACEMENT
To maintain quality of picture (better balance of color and brightness in entire screen), we recommend replacing
all 4 lamps at a time.
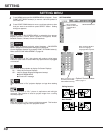
LAMP REPLACEMENT
When the life of the Projection Lamp of this projector draws to an end,
the LAMP REPLACE indicator lights yellow. If this indicator lights
yellow, replace the projection lamp with a new one promptly.
For continued safety, replace with a lamp assembly of
the same type.
Do not drop a lamp assembly or touch a glass bulb! The
glass can shatter and may cause injury.
Allow a projector to cool, for at least 45 minutes before
you open Lamp Cover. The inside of a projector can
become very hot.
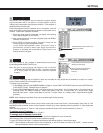
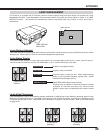
REAR INDICATORS
CAUTION
READY
LAMP
LAMP
REPLACE
WARNING
TEMP.
WARNING
TEMP.
READY
LAMP
REPLACE
LAMP
FRONT INDICATORS
LAMP REPLACE
INDICATOR