


4
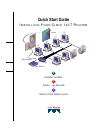
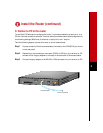
Install the Router (continued)
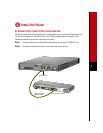
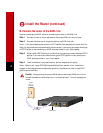
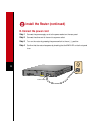
B. Connect the router to the ADSL line
Use the included purple ADSL cable for connecting the router to the ADSL line.
Step 1 Connect one end of the purple cable to the purple ADSL port on the router.
Step 2 Connect the other end of the purple cable to the ADSL wall jack.
Note: If you are connecting the router to a POTS splitter that uses data port pins 3 and 4 for
data, you should use the purple cable with the blue stripe. If you are not sure about what type
of POTS splitter to use, contact your ADSL service provider or your Cisco reseller.
Step 3 Either install a POTS splitter, or confirm that your service provider installed a POTS
splitter. If you are not sure about what type of POTS splitter to use, contact your
ADSL service provider or your Cisco reseller.
Step 4 Install microfilters if you need them for optimal telephone call quality.
Note: Refer to the “Using POTS Splitters and Microfilters” section in the “Installation”
chapter of the installation and configuration guide for information on when to use POTS
splitters and microfilters.
Caution Always connect the purple ADSL cable to the purple ADSL port. Do not
connect the cable to the Ethernet port or to the console port. This will damage your
router.
Cisco 1417
CONSOLE
ADSL
ETHERNET
LNK
OK FLASH PC CARD
17500
ADSL
(RJ-11)
wall jack
RJ-11 cable
ADSL port