


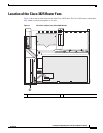


17
Installing and Upgrading Fans in the Cisco 3825 Series Routers
78-18642-01
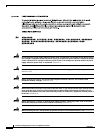
Upgrading the Cisco 3825 Fan Unit
Step 1 Lower the fan unit down and onto the chassis floor.
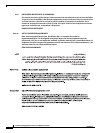
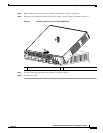
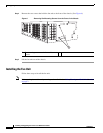
Step 2 Attach fan 1 to the J4 connector on the motherboard. (See number 1 and 2 in Figure 7.)
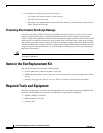
Figure 7 Attaching Fan Cable to the J Connectors
Step 3
Attach fan 2 to the J18 connector on the motherboard. (See number 3 and 4 in Figure 7.)
Step 4 Attach fan 3 to the J25 connector on the motherboard. (See number 5 and 6 in Figure 7.)
Caution The connectors are polarized/keyed to allow easy insertion in one orientation only. Orient the fan
connectors correctly before you insert them. Incorrect orientation can damage the connector pins.
Step 5 Reinstall the two screws on the front of the chassis. (See Figure 6 on page 16.)
Step 6 Reinstall the four screws on the side of the chassis. (See Figure 5 on page 15.)
Step 7 Reinstall the two screws on the top of the fan unit. (See Figure 4 on page 15.)
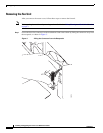
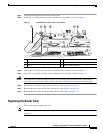
Replacing the Router Cover
Follow these steps to replace the cover.
Note Before you begin, read the safety warnings as described in the “Safety Warnings and Guidelines” section
on page 2.
1 Fan 1 2 Fan 1 to J4 connector
3 Fan 2 4 Fan 2 to J18 connector
5 Fan 3 6 Fan 3 to J25 connector
1 2 43 65
280475