


3-16
Cisco ATA 186 and Cisco ATA 188 Analog Telephone Adaptor Administrator’s Guide (H.323)
OL-4008-01
Chapter3 Configuring the CiscoATA for H.323
Voice Configuration Menu
Using the Voice Configuration Menu
To manually configure the Cisco ATA by using the voice configuration menu and the telephone keypad,
perform the following steps:
Procedure
Step 1 Connect an analog touch-tone phone to the port labeled Phone 1 on the back of the Cisco ATA.
Step 2 Lift the handset and press the function button located on the top of the Cisco ATA. You should receive
the initial voice configuration menu voice prompt.
Step 3 Using the telephone keypad, enter the voice menu code for the parameter that you want to configure or
the command that you want to execute, then press #. For a list of voice menu codes, see Appendix B,
“Voice Menu Codes.”
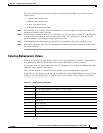
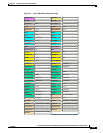
Table 3-5 lists the menu options that you need to configure basic IP connectivity for the Cisco ATA, after
which you can use the Cisco ATA web configuration page to configure additional parameters.
Note If you are using the voice configuration menu to statically configure the Cisco ATA IP address,
you must disable DHCP by setting its value to 0.
Step 4 Follow the voice prompts and enter the appropriate values, then press the # key.
Note Use the * key to indicate a delimiter (dot). For example, to enter an IP address of 192.168.3.1,
you would enter 192*168*3*1 on your telephone keypad.
Note When entering values for a field that contains a hexadecimal value, you must convert the
hexadecimal value to a decimal value in order to enter it into the voice configuration menu
system. For example, to enter the hexadecimal value 0x6A, you would enter the number 106 on
the telephone keypad.
Table 3-5 Parameters that Provide Basic IP Connectivity for the Cisco ATA
Voice Menu
Number Features
1 StaticIP—IP address of the Cisco ATA.
2 StaticRoute—Default gateway for the Cisco ATA to use.
10 StaticNetMask—Subnet mask of the Cisco ATA.
20 DHCP—Set value to 0 to disable the use of a DHCP server; set value to 1 to enable
DHCP.
21 Review the IP address of the Cisco ATA.
22 Review the default router for the Cisco ATA to use.
23 Review subnet mask of the Cisco ATA.