


Cisco 12012 Gigabit Switch Router Switch Fabric Cards Replacement Instructions 11
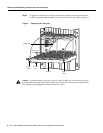
Removing and Replacing a Card in the Lower Card Cage
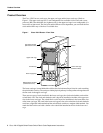
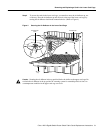
Note When you install a clock and scheduler card or a switch fabric card in the lower
card cage make sure that you keep the card centered in the slot by applying even pressure
to both sides of the card carrier as you slide it into the slot.
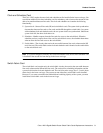
Step 4 Pivot the two card ejector levers out ninety degrees away from the sides of the card carrier.
Step 5 Continue sliding the card into the slot until the card ejector levers engage the edges of the
lower card cage slot and both ejector levers begin to pivot.
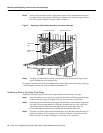
Note Both types of cards have guide pins that make initial contact with the backplane
connector. After the guide pins make contact, continue pushing on the card carrier until
the card ejector levers both start pivoting, then stop pushing. Use the card ejector levers
to fully insert the card in the backplane connector.
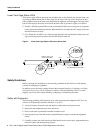
Step 6 Grasp both card ejector levers and pivot them toward the sides of the card cage until they
are parallel to the card carrier edge, to seat the card in the backplane connector. Press on
the ejector levers until they snap into the card carrier.
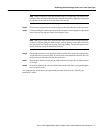
Step 7 Release the air deflector latch (turn the latch clockwise) and lower the air deflector down
to its stops.
Step 8 Pivot the air filter tray up so that it is flush with the front of the lower card cage and tighten
the two captive screws.
This completes the switch fabric card replacement procedure. Proceed to the “Checking the
Installation” section.