


Americas Headquarters
Cisco Systems, Inc.
170 West Tasman Drive
San Jose, CA 95134-1706
USA
www.cisco.com
Small Business Support US: 1-866-606-1866 (Toll Free, 24/7)
Small Business Support, Global: www.cisco.com/go/sbsc
Cisco and the Cisco Logo are trademarks of Cisco Systems, Inc. and/or its affiliates in the U.S. and
other countries. A listing of Cisco's trademarks can be found at www.cisco.com/go/trademarks.
Third party trademarks mentioned are the property of their respective owners. The use of the word
partner does not imply a partnership relationship between Cisco and any other company. (1005R)
© 2010 Cisco Systems, Inc. All rights reserved.
78-19733-01
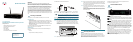
Back Panel
RESET Button—The RESET button has two functions:
• If the Cisco RV220W is having problems connecting to the Internet, press
the RESET button for at least 3 but no more than 10 seconds with a paper
clip or a pencil tip. This is similar to pressing the reset button on your PC to
reboot it.
• If you are experiencing extreme problems with the Cisco RV220W and have
tried all other troubleshooting measures, press and hold in the RESET
button for more than 10 seconds. This reboots the unit and restores the
factory defaults. Changes you have made to the Cisco RV220W settings
are lost.
WAN Port—The WAN port is connected to your Internet device, such as a
cable or DSL modem.
LAN Ports (1-4)—These ports provide a LAN connection to network devices,
such as PCs, print servers, or switches.
Power Port—The power port is where you connect the provided power
adapter.
Power Switch—Press this button up (toward the line) to turn the firewall on.
Press this button down (toward the circle) to turn the firewall off.
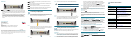
Connecting the Equipment
STEP 1 You should already have an Ethernet cable connecting your PC to your
current cable or DSL modem. Unplug one end of the cable from your PC
and plug it into the port marked “WAN” on the unit.
STEP 2 Connect one end of a different Ethernet cable to one of the LAN
(Ethernet) ports on the back of the unit. (In this example, the LAN 2 port
is used.) Connect the other end to an Ethernet port on the PC that you
will use to run the web-based Device Manager.
STEP 3 Power on the cable or DSL modem and wait until the connection is
active.
4
STEP 4 Connect the power adapter to the Cisco RV220W POWER port.
CAUTION Use only the power adapter that is supplied with the unit. Using
a different power adapter could damage the unit.
STEP 5 Plug the other end of the adapter into an electrical outlet. You may
need to use a specific plug (supplied) for your country.
STEP 6 On the Cisco RV220W, push the power button to the on position to turn
on the firewall. The POWER light on the front panel is green when the
power adapter is connected properly and the unit is turned on.
Getting Started with the Configuration
NOTE The Device Manager is supported on Microsoft Internet Explorer 6.0 or
later, Mozilla Firefox 3.0 or later, and Apple Safari 3.0 or later.
Logging In
STEP 1 Power on the PC that you connected to the LAN2 port in Step 2 of the
Connecting the Equipment section. Your PC becomes a DHCP client
of the firewall and receives an IP address in the 192.168.1.xxx range.
STEP 2 Start a web browser on your PC. In the Address bar, enter the default
IP address of the firewall: 192.168.1.1. A message appears about the
5
site’s security certificate. The Cisco RV220W uses a self-signed
security certificate and this message appears because the firewall is
not known to your PC. You can safely click Continue (or the option
shown on your particular web browser) to go to the web site.
STEP 3 When the login page appears, enter the user name and password. The
default user name is cisco. The default password is cisco. Passwords
are case sensitive.
NOTE For security reasons, change the default user name and password as
soon as possible. See the Changing the Administrator User Name and
Password section.
STEP 4 Click Log In.
The Getting Started page displays some of the most common configuration
tasks. Click these tasks to view the configuration windows.
To view other configuration tasks, click a menu item on the left panel to expand
it. Click the menu names displayed underneath to perform an action or view a
sub-menu.
Configuring WAN (Internet) Settings
From the Getting Started page, click Configure WAN Settings. The Cisco
RV220W tries to automatically detect and configure your settings; however, in
some cases you might need to provide information about your Internet
connection type. You can get this information from your Internet Service
Provider (ISP). See the Online Help or
Cisco RV220W Administrator Guide
for
more information on configuring Internet settings.
Changing the Administrator User Name and Password
STEP 1 In the left panel, choose Administration.
STEP 2 Click Users, and choose Users. The Users Table appears. The default
administrator user and password is listed and is noted by
“Administrator,” which appears in the Type column.
STEP 3 Check the box for the administrator user, and click Edit. Follow the
instructions in the Online Help to change the password and save.
Configuring Wireless Settings and Security
From the Getting Started page, click Review Wireless Profile and Set Security
Settings. See the Online Help or
Cisco RV220W Administrator Guide
for more
information.
Where to Go From Here
Support
Cisco Small Business
Support Community
www.cisco.com/go/smallbizsupport
Cisco Small Business
Support and Resources
www.cisco.com/go/smallbizhelp
Phone Support Contacts www.cisco.com/en/US/support/
tsd_cisco_small_business
_support_center_contacts.html
Cisco Small Business
Firmware Downloads
www.cisco.com/cisco/web/download/
index.html
Select a link to download firmware for Cisco
Small Business Products. No login is
required.
Product Documentation
Cisco Small Business
Routers and Firewalls
www.cisco.com/go/smallbizrouters
Cisco Small Business
Cisco Partner Central
for Small Business
(Partner Login Required)
www.cisco.com/web/partners/sell/smb
Cisco Small Business
Home
www.cisco.com/smb
6