


Cisco Small Business SLM Series Smart Switch Installation Guide 5
• Ambient Temperature — To prevent the switch from overheating, do
not operate it in an area that exceeds an ambient temperature of 104°F
(40°C).
•Air Flow — Be sure that there is adequate air flow around the switch.
•Mechanical Loading — Be sure that the switch is level and stable to
avoid any hazardous conditions.
•Reliable earthing — Reliable earthing of rack-mounted equipment
should be maintained. Particular attention should be given to supply
connections other than direct connections to the branch circuit (e.g. use
of power strips).
Desktop Placement
To place the switch on a desktop, do the following:
• Attach the rubber feet to the recessed areas on the bottom of the
switch.
• Place the switch on a desktop near an AC power source.
• Keep enough ventilation space for the switch and check the
environmental restrictions mentioned above.
• Connect the switch to network devices according to the installation
instructions below in section 4, “Connecting the Equipment”.
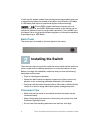
Rack Mounting
You can mount the switch in any standard size, 19-inch (about 48 cm) wide
rack. The switch requires 1 rack unit (RU) of space, which is 1.75 inches
(44.45 mm) high.
CAUTION Do not overload the power outlet or circuit when installing
multiple devices in a rack.
STEP 1 Place the switch on a hard, flat surface with the front panel facing
you.
STEP 2 Attach a rack–mount bracket to one side of the switch with the
supplied screws and secure the bracket tightly.
STEP 3 Follow the same steps to attach the other bracket to the opposite
side.
STEP 4 After the brackets are attached to the switch, use suitable screws
to securely attach the brackets to any standard 19-inch rack.