


IP Configuration
IPv4 Management and Interfaces
263 Cisco Small Business 300 Series Managed Switch Administration Guide
16
STEP 3 Click Apply. The ARP proxy is enabled, and the Running Configuration file is
updated.
UDP Relay/IP Helper
The UDP Relay/IP Helper feature is only available when the device is in Layer 3
system mode. Switches do not typically route IP Broadcast packets between IP
subnets. However, if this feature enables the device to relay specific UDP
Broadcast packets, received from its IPv4 interfaces, to specific destination IP
addresses.
To configure the relaying of UDP packets received from a specific IPv4 interface
with a specific destination UDP port, add a UDP Relay:
STEP 1 Click IP Configuration > IPv4 Management and Interfaces > UDP Relay/IP
Helper.
STEP 2 Click Add.
STEP 3 Select the Source IP Interface to where the device is to relay UDP Broadcast
packets based on a configured UDP destination port. The interface must be one of
the IPv4 interfaces configured on the device.
STEP 4 Enter the UDP Destination Port number for the packets that the device is to relay.
Select a well-known port from the drop-down list, or click the port radio button to
enter the number manually.
STEP 5 Enter the Destination IP Address that receives the UDP packet relays. If this field
is 0.0.0.0, UDP packets are discarded. If this field is 255.255.255.255, UDP packets
are flooded to all IP interfaces.
STEP 6 Click Apply. The UDP relay settings are written to the Running Configuration file.
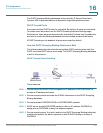
DHCPv4 Snooping/Relay
DHCPv4 Snooping
DHCP snooping provides a security mechanism to prevent receiving false DHCP
response packets and to log DHCP addresses. It does this by treating ports on the
device as either trusted or untrusted.