


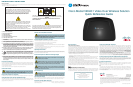

1 Wireless LED
2 Wi-Fi Protected Setup (WPS) button
3 Wi-Fi Protected Setup (WPS) LED
4 Ethernet LED
5 Power LED
Front Panel
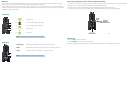
Connecting the Wireless Access Point to a Wireless Gateway
1. Connect the 12 VDC Power Supply plug to the wall power outlet. Use only the power adapter provided with this product.
2. Connect the power plug to the power receptacle on the wireless access point.
3. Connect one end of the RJ-45 Ethernet cable to the Ethernet port on the wireless access point.
4. Connect the other end of the RJ-45 Ethernet cable to an available Ethernet port on your wireless gateway.
Note: This illustration may vary from the actual product.
T14853
1
2
4
3
5
1 Ethernet Port Connects the wireless access point to a wireless gateway
2 Reset Restores factory default settings when held for more than 5 seconds
3 Power Connects device to the external 12 VDC power supply
Back Panel
T14854
12VDC
Reset
Ethernet
1
2
3
Note: This illustration may vary from the actual product.
Pair Devices
1. Press the OK button on the receiver.
2. Press the WPS button on the wireless access point.
Refer to the installation guide included with your ISB7005 Wireless Receiver for troubleshooting information.
12VDC
Reset
Ethernet
T15012
To Wall
Power Outlet
RJ-45
Cable
Wireless
Gateway
Ethernet Port
Welcome
With the VEN401 Video Over Wireless Solution, you can put a set-top almost anywhere in the home. The VEN401 (Wireless
Access Point) must be accompanied by the Cisco ISB7005 Wireless Receiver (set-top).
Simply connect the Wireless Access Point to your wireless gateway. Then, power up your set-top. Once you pair the devices,
you don’t need cables or wall jacks to pass high-de nition video streams from the Internet to your set-top. Follow these simple
instructions to get connected now.