3
Installation
The following section describes the procedure for rack mounting the NetScaler hardware.
Note The illustrations in the following sections may not represent the actual NetScaler appliance.
Rack Mounting a Citrix NetScaler Appliance
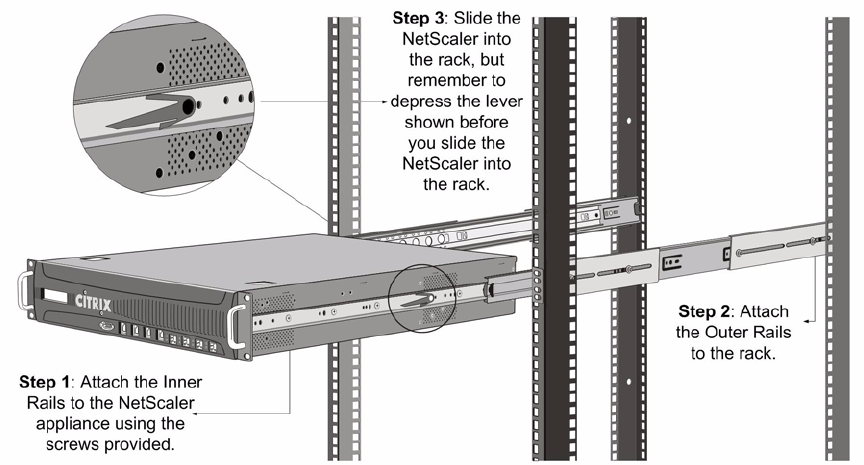
The appliance is shipped with rack-rail hardware. This hardware consists of two inner rails that are
secured to the appliance, one on each side, and a rack rail assembly that is attached to the rack.
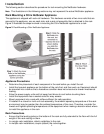
Figure 3 illustrates the steps involved in mounting the Citrix NetScaler appliance to a rack.
Figure 3 Rack Mounting a Citrix NetScaler Appliance
Appliance Precautions
• Determine the placement of each component in the rack before you install the rail.
• Install the heaviest appliance on the bottom of the rack first, and then work up. Equipment should
be mounted into a rack so that a hazardous condition does not arise due to uneven mechanical
loading.
• Allow the power supply units and hot swap hard drives to cool before touching them.
• Install the equipment near a socket outlet for easy access.
• Mount equipment into a rack with airflow sufficient for safe operation.
• If installed in a closed or multi-unit rack assembly, the ambient operating temperature of the rack
environment may be greater than the ambient temperature of the room. Therefore, consider the
lowest and highest operating temperatures of the equipment when making a decision about where
to install the appliance in the rack.
Rack Precautions
• Ensure that the leveling jacks on the bottom of the rack are fully extended to the floor with the full
weight of the rack resting on them.
• In a single rack installation, attach a stabilizer to the rack.
• In multiple rack installations, couple (attach) the racks together.


