


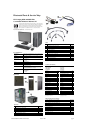

8000 & 8080 Elite IPSM, CMT Chassis 600574-002 page 4
Password Security
Establishing a Setup or Power-On password:
1. Turn on or restart the computer. If you are in Windows, click Start > Shut Down >Restart.
2. As soon as the computer is turned on, press F10 when the monitor light turns green to enter
Computer Setup. Press Enter to bypass the title screen, if necessary. If you do not press F10
when prompted, a restart will be necessary.
3. To establish a Setup password, select Security > Setup Password and follow the instructions
on the screen.
- or -
To establish a Power-On password, select Security > Power-On Password and follow the
instructions on the screen
4. Before exiting, click File > Save Changes and Exit.
Changing a Setup or Power-On password:
1. Turn on or restart the computer. If you are in Windows, click Start > Shut Down > Restart.
To change the Setup password, go to step 2.
To change the Power-on password, go to step 3.
2. To change the Setup password, as soon as the computer is turned on, press F10 when the
monitor light turns green to enter Computer Setup. Press Enter to bypass the title screen, if
necessary.
3. When the key icon appears, type your current password, a slash (/) or alternate delimiter
character, your new password, another slash (/) or alternate delimiter character, and your new
password again as shown:
current password/new password/new password.
NOTE: Type the new password carefully since the characters do not appear on the screen.
4. Press Enter.
The new password will take effect the next time the computer is restarted.
Deleting a Power-On or Setup password
1. Turn on or restart the computer. If you are in Windows, click Start > Shut Down > Restart.
To delete the Setup password, go to step 2.
To delete the Power-On password, go to step 3.
2. To change the Setup password, as soon as the computer is turned on, press F10 when the
monitor light turns green to enter Computer Setup. Press Enter to bypass the title screen, if
necessary.
3. When the key icon appears, type your current password followed by a slash (/) or alternate
delimiter character as shown. Example: currentpassword/
4. Press Enter.
Hewlett-Packard Vision Diagnostics
The Hewlett-Packard Vision Diagnostics utility allows you to view information about the hard-
ware configuration of the computer and perform hardware diagnostic tests on the subsystems of
the computer. The utility simplifies the process of effectively identifying, diagnosing, and iso-
lating hardware issues.
Use HP Vision Diagnostics to determine if all the devices installed on the computer are recog-
nized by the system and functioning properly. Running tests is optional but recommended after
installing or connecting a new device.
To access HP Vision Diagnostics, you must create a Recovery Disc Set then boot to the CD con-
taining the utility. It can also be downloaded from http://www.hp.com and either burned to CD
or installed to a USB flash drive.
1. In Windows Explorer, go to C:\SWSetup\ISOs and burn the file Vision Diagnostics.ISO to a
CD or copy it to a USB flash drive.
2. While the computer is on, insert the CD in the Optical Drive or USB flash drive in a USB port
on the computer.
3. Shut down the operating system and turn off the computer.
4. Turn on the computer. The system will boot into HP Vision Diagnostics.
NOTE: If the system does not boot to the CD in the optical drive or to the USB flash drive,
you may need to change the boot order in the Computer Setup (F10) utility.
5. At the boot menu, select either the HP Vision Diagnostics utility to test the various hardware
components in the computer or the HP Memory Test utility to test memory only.
NOTE: The HP Memory Test is a comprehensive memory diagnostic utility that is run as a
stand-alone application, outside of HP Vision Diagnostics.
6. If running HP Vision Diagnostics, select the appropriate language and click Continue.
7. In the End User License Agreement page, select Agree if you agree with the terms. The HP
Vision Diagnostics utility launches with the Survey tab displayed.
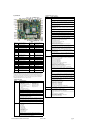
Clearing CMOS
1. Turn off the computer and any external devices, and disconnect the power cord from the
power outlet.
2. Remove the chassis access panel.
3. On the system board, press and hold the CMOS button for 5 seconds.
4. Replace the chassis access panel and reconnect the power cord.
5. Turn on the computer and allow it to start.
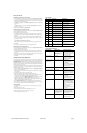
Diagnostic LEDs
LED Color LED Activity State/Message
Power Green On Computer on
Power Green 1 blink every 2 seconds Normal Suspend Mode
Power Red 1 blink every second followed
by a 2 second pause
CPU thermal shutdown
Power Red 3 blinks, 1 blink every second
followed by a 2 second pause
Processor not installed
Power Red 4 blinks, 1 blink every second
followed by a 2 second pause
Power failure (power supply overload)
Power Red 5 blinks, 1 blink every second
followed by a 2 second pause
Pre-video memory error
Power Red 6 blinks, 1 blink every second
followed by a 2 second pause
Pre-video graphics error
Power Red 7 blinks, 1 blink every second
followed by a 2 second pause
System board failure (ROM
Power Red 8 blinks, 1 blink every second
followed by a 2 second pause
Invalid ROM based on Checksum
Power Red 9 blinks, 1 blink every second
followed by a 2 second pause
System powers on but is unable to boot
Power Red 10 blinks, 1 blink every second
followed by a 2 second pause
Bad option card
Power Red 11 blinks, 1 blink every second
followed by a 2 second pause
The current processor does not support
a feature previously enabled on this
system.
none none System does not power on and
LEDs are not flashing
System unable to power on
Common POST Error Messages
Screen Message Probable Cause Recommended Action
101-Option ROM Error 1. System ROM checksum
error.
2. Expansion board option
ROM checksum
1. Verify ROM, reflash if required
2. Remove suspected card, reboot
3. Clear CMOS memory, reboot
4. Replace system board
103-System Board
Failure
DMA, timers 1. Clear CMOS memory.
2. Remove expansion boards.
3. Replace system board.
164-Memory Size Error
and
201-Memory Error
Incorrect memory configu-
ration
1. Run Setup (F10).
2. Check DIMMs for proper
seating, type, and HP
compatibility.
3. Remove DIMMs singularly and
reboot to isolate faulty DIMM.
4. Replace system board.
214-DIMM Configura-
tion Warning
Populated DIMM configura-
tion is not optimized
Rearrange the DIMMs so that
each channel has the same amount
of memory.
301-, 304-Keyboard error Keyboard failure. Check keyboard connection or
keys. Check connector for bent of
missing pins. Replace keyboard. If
304, possible system board prob-
lem.
501-Display Adapter
Failure
Graphics display controller. 1. Reseat graphics card.
2. Clear CMOS.
3. Check monitor connection.
4. Replace graphics card.
1720-SMART Hard Drive
Detects Imminent Failure
Hard drive is about to fail. 1. Determine if hard drive is
giving correct error message.
Enter Computer Setup and run
the Drive Protection System
test under Storage > DPS Self-
test.
2. Apply hard drive firmware
patch if applicable.
3. Back up contents and replace
hard drive.
1796-SATA Cabling Error One or more SATA devices
are improperly attached. For
optimal performance, the
SATA 0 and SATA 1 con-
nectors must be used before
SATA 2 and SATA 3.
Ensure SATA connectors are used
in ascending order. For one
device, use SATA 0. For two
devices, use SATA 0 and SATA 1.
For three devices, use SATA 0,
SATA1, and SATA 2.
1801-Microcode Patch
Error
Processor not supported by
ROM BIOS.
1. Upgrade BIOS to proper
version.
2. Change the processor.