


Compaq Deskpro EX and Deskpro EXS Series of Personal Computers 4-15
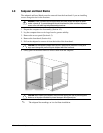
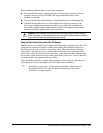
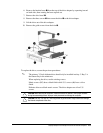
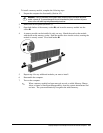
6. Remove the bracket brace 1 from the top of the drive adapter by squeezing inward
on both sides, then rotating the brace up and out.
7.
Remove the drive bezel 2.
8. Remove the three screws 3 that secure the drive 4 to the drive adapter.
9. Lift the drive out of the drive adapter.
10.
Remove the guide screws from the drive 5.
To replace the drive, reverse the previous procedures.
✎
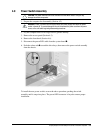
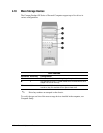
The primary 3.5-inch diskette drive should only be installed into bay 3. Bay 3 is
the bottom bay in the minitower.
When replacing the drive, use the existing screws.
Metric screws (M3) have a black finish while U.S. screws (#6) have a silver
finish.
Diskette drives use black metric screws. The drive adapters use silver U.S.
screws.
CAUTION: When servicing the computer, ensure that cables are placed in their proper locations
during the reassembly process. Improper cable placement can damage the computer.
CAUTION: Use only 3/16-inch or 5-mm long screws as guide screws. Longer screws can damage
the internal components of the drive.