3
Introduction
The Dymo Labelpoint LP300 enables you to create a wide
variety of high quality self-adhesive labels of up to 90
characters.
The Labelpoint uses 6mm (
1
/
4
"), 9mm (
3
/
8
"), 12mm (
1
/
2
") or
19mm (
3
/
4
") wide tape cassettes in a number of label
colours. Labels are back slit for easy removal from the
backing tape. Text can be printed horizontally or vertically
in a variety of sizes and styles and can be left-justified,
right-justified or centred on the label.
Visit www.dymo.com for information on obtaining tapes
and accessories for your LP300.
Warranty Registration
Please complete the warranty registration card and return
it to the relevant address, within seven days– see the
warranty booklet for details.
Power Supply
BATTERIES
• Apply pressure to thumb catch then open and lift away
battery compartment cover – see fig
A➊, page 2.
• Insert six size AA alkaline or re-chargeable Nickel-
cadmium batteries, observing the polarity markings
A➋, and close cover.
• Remove batteries if the Labelpoint is to be unused for
some time.
AC ADAPTOR (optional)
• Connect the AC adaptor to socket
A➌. Inserting the
adaptor plug disconnects the supply from the batteries.
• Unplug the AC adaptor from the Labelpoint before
disconnecting the mains power to the adaptor,
otherwise last label memory settings will be lost (see
also ON/OFF).
Changing the cassette
• Press catch in and open hinged access doorB➊.
• Hold as shown, then lift cassette
B➋ straight up and
out.
• Ensure tape and ribbon
B➌ are taut across mouth of
cassette and tape passes between guideposts before
installing as shown. If necessary, turn spool
B❹
clockwise to tighten ribbon.
• Check that cassette switch
B❺ is set for the cassette type
– see page 2. A notch in the cassette will fit over the
switch when it is set correctly.
• Insert cassette with tape and ribbon positioned as
shown between print head
C➊ and pinch rollerC➋.
• Push
firmly
C➌ until cassette
clicks
into place. Ensure
tape and ribbon are positioned correctly.
• Close door
B➊ until it clicks shut.
GB
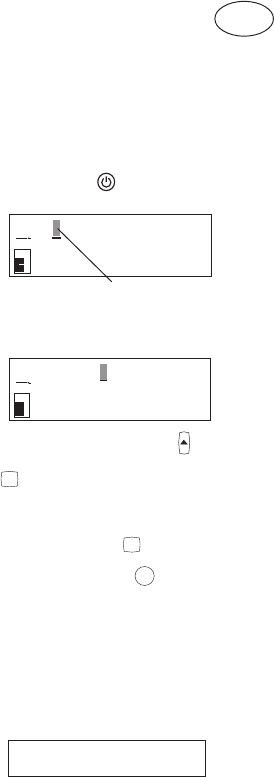
DYMO
Cursor flashing
DYMO
1
Creating your first label
You will no doubt be anxious to see what your
new Labelpoint LP300 can do. Before we go on to explore
the many advanced features of the LP300, follow these
simple steps to create your first label:
1. Fit the batteries, or connect the AC adaptor, plug in and
switch on at the wall socket - ‘Power Supply’.
2. Open the cassette compartment lid and check that the
tape cassette is fitted correctly – see page 2 and
‘Changing the Casette’.
3. Close the lid, then press
to switch the power on.
The display should look like this:
4. Use the keyboard to type in your full name.
Each character you enter will appear on the display, for
example:
•For an UPPER CASE character, press
once followed
by the character required.
•Press
CAPS
for all subsequent characters in UPPER
CASE.
• Press the space bar once for the space between each
name.
If you make a mistake, press
DEL
to delete the error,
then type in the correction.
5. When you have finished, press
PRINT
. A label will be
printed and will emerge from the slot in the top of the
machine. Wait until the mechanism has stopped, then
press down the cutter lever E to cut off the label and
remove it from the machine.
You should now have a high quality printed name label —
don’t waste it! If this is your personal machine, why not
fix the label to the underside to identify its owner? You
have just found the first of many uses for your DYMO
labels.


