Connecting Up
1. Switch off your computer.
2. Connect the Voyager Local Unit to the PC KVM Cable
3. Plug in your Keyboard, Monitor and Mouse into the corresponding Keyboard, Monitor and
Mouse ports on the Voyager Local Unit. (You can use the Voyager without having a Local
Keyboard, Monitor and Mouse connected).
4. Connect your UTP cable to the Voyager Local Unit.
5. Connect the PC KVM cable to your computer’s Keyboard Monitor and Mouse ports.
6. Connect the other end of your UTP cable to the Voyager Remote Unit.
7. Connect the power supply unit to the Voyager Remote unit.
8. Plug in your Keyboard, Monitor and Mouse into the corresponding Keyboard, Monitor and
Mouse ports on the Voyager Remote Unit.
9. Power on your computer.
10. Check that the keyboard and mouse operate correctly.
11. Adjust the Video Equalisation if required on the Voyager Remote Unit which contains video
equalisation circuitry that will compensate for the loss in image quality experienced when
sending video over long cables.
To set the correct level of equalisation there is an adjustment wheel on the rear side of the Voyager
Remote Unit. Select and adjust the range appropriate to the cable length (these only need to be set
once.)
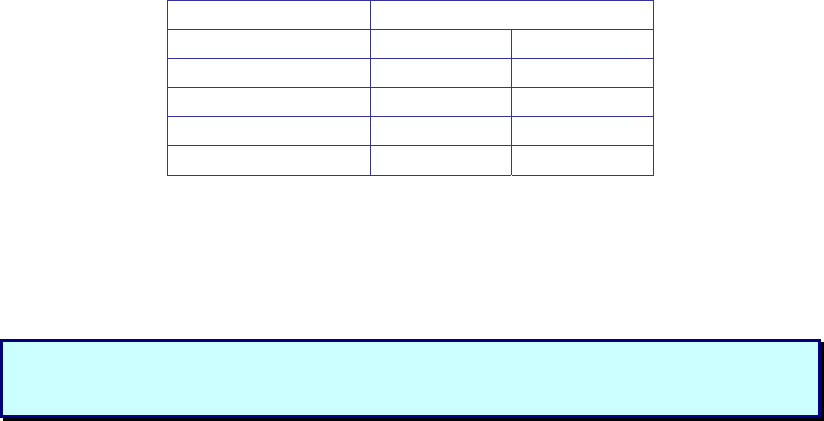
Switch Position Cable Length
0 0 – 30 m 0 – 100 ft
1 30 – 50 m 100 – 150 ft
2 50 – 70 m 150 – 230 ft
3 70 – 100 m 230 – 330 ft
4 - 9 70 – 100 m 230 – 330 ft
The remote unit (when installed in its final location) may be left permanently powered up.
Please note that for all practical purposes cable equalisation cannot be exact - the remote image will
never be as sharp as the original. The Voyager’s equalisation system is designed so that it produces
very good results on short to medium length cables and an acceptable quality over longer cables.
Note: If you are at the top end of a cable length range, say 45m, you may achieve a
better quality video compensation by selecting the next cable length range, e.g. setting
the switch to position 2 instead of position 1.


