


12 Installation Guide
d
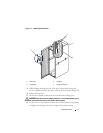
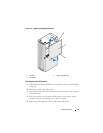
Lay the door in a safe location with the door’s outer surface
facing upward.
Laying the door flat with the outer surface facing upward helps
prevent damage to its cosmetic coating.
e
Repeat step a through step d for the left back door.
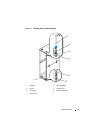
Replacing the Back Doors
To replace the back doors, perform the steps for removal in reverse.
Removing and Replacing the Side Panels
CAUTION: For stand-alone racks, reinstalling the side panels is necessary
before running systems in the rack to ensure proper cooling within the rack.
NOTE: You must remove the lower side panels in order to install the side
stabilizer feet.
NOTE: Although removing the side panels is not mandatory for installing
systems in a rack, having the sides open makes it easier to install slide assemblies
and support rails and to reverse the direction that the front door opens.
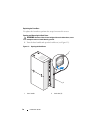
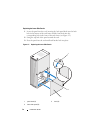
Removing the Upper Side Panels
1
Pull both latches up and swing the bottom end of the panel away
from the rack.
2
Grasp firmly on each side of the panel.
3
Lift the panel upward until the panel lip clears the top of the rack.
4
Lay the panel in a safe location with the panel’s outer surface facing
upward to help prevent damage to its cosmetic coating.
5
Repeat step 1 through step 4 for the other upper side panel.
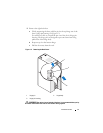
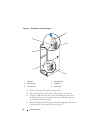
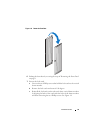
Replacing the Upper Side Panels
1
Lift the upper side panel up onto the rack, hooking the panel lip over
the top of the rack (see Figure 1-4).
2
Swing the bottom of the panel downward onto the rack.
3
Press the panel into the rack until both latches lock into place.