


10 Dell PowerEdge 4x00 and 6x00 Systems Rack Installation Guide
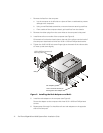
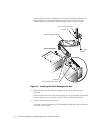
a. Position the mounting-bracket flange at the back of the slide assembly so
that the alignment marks are aligned with the indentations on the rack.
Secure the mounting bracket with two 10-32 x 0.5-inch Phillips-head screws.
Do
not
completely tighten the two screws until you install the computer and
verify that the width between the slide assemblies is correct.
b. Position the mounting-bracket flange at the front of the slide assembly so
that the alignment marks are aligned with the indentations on the rack.
Secure the mounting bracket with two 10-32 x 0.5-inch Phillips-head screws.
c. If necessary, adjust the slide assemblys length until the mounting-bracket
flange fits snugly against the back of the rails on both ends.
d. Tighten the slide alignment screw you loosened in step 5.
7. Repeat steps 5 and 6 to install the second slide assembly.
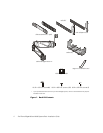
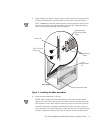
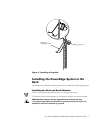
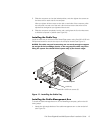
8. Install the cage nuts (see Figure 8):
a. Insert the lower lip of the cage nut over the bottom of the opening in the
back of a rail as shown in Figure 8. Then insert the small end of the cage-nut
installation tool through the opening in the rail (from the front), and hook the
tool over the top lip of the cage nut.
b. Push in on the cage nut while rotating the tool up and pulling it back toward
you (see Figure 8) until the top lip of the cage nut snaps into position.
c.
Repeat steps a and b to install the remaining cage nuts.