


1-4 Dell Inspiron Advanced Port Replicator User’s Guide
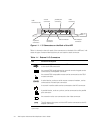
Connecting External Devices to the APR
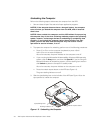
To attach external devices to the APR, perform the following steps:
1. Refer to Figure 1-1 to attach external devices to the appropriate connectors on the
back of the APR.
NOTE: If the cable connector from the external device has thumbscrews, be sure
to tighten them to ensure a proper connection.
For detailed information on using external devices with your computer, see
“Connecting External Devices” in the system Help.
2. Connect the external devices to an electrical outlet, if applicable.
Connecting the Computer to the APR
You must attach an AC adapter to the APR before you dock and turn on the computer.
The AC adapter powers the APR and the computer at the same time. Any battery
installed in the computer charges while you use the APR.
NOTICE: Always use the Dell AC adapter that came with the APR. (Look for
model number PA-6 on the bottom of the AC adapter.) If you use any other
commercially available AC adapter—or the AC adapter from earlier models
of Dell computers—you may damage the APR or the computer.
Before you initially connect your computer to the APR, the operating system must
complete its setup process. To verify that the operating system has completed the
setup process, perform the following steps:
1. Be sure that the computer is not docked in the APR.
2. Turn on the computer.
3. Verify that your computer’s operating system completes the setup process. For
instructions, refer to the Setup Guide that accompanied your computer.
4. Turn off the computer.
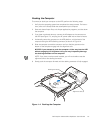
You can now connect your computer to the APR as described in the following
subsection, “Docking the Computer.”