


Dell E550 Color Monitor Quick Setup Guide
2
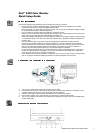
1.
Power button
Use this button to turn the monitor on and off.
2.
Power indicator
This light glows green during normal operation.
3.
ADJUST -/+
These buttons allow you to adjust the settings to lower or higher value of the
selected function.
4.
SELECT -/+
These buttons allow you to select from the various functions.
5.
Function indicators
The indicator will turn green when you select the respective function.
The description of function indicators is as below:
Brightness:
adjusts the background brightness of the screen image.
Contrast:
adjusts the contrast between the foreground and background of the screen image.
Horizontal size:
adjusts screen width.
Horizontal position:
moves screen image to the left or right.
Vertical size:
adjusts screen height.
Vertical position:
moves screen image up or down.
Pincushion:
straightens the left and right vertical edges of the display.
Trapezoid:
adjusts the width of the top and bottom of the screen.
Rotation:
adjusts the viewing area when it is tilted left or right.
Use the monitor CD to install the appropriate monitor driver for your operating system.
Windows 98 automatically detects the new monitor and displays the
Add New Hardware Wizard
dialog box if
the monitor driver is not already installed.
1. Insert the monitor CD into the CD-ROM drive, and click
Next>
twice when the
Add New Hardware Wizard
dialog box appears.
2. Click the
CD-ROM drive
box to install the drivers from the CD and then click
Next>
.
3. Confirm that the driver was found on the CD, and click
Next>
twice to install the driver.
4. Click
Finish
to exit the
Add New Hardware Wizard
dialog box.
To manually install or update the driver, perform the following steps:
1. Click
Start
−
> Settings
−
> Control Panel
and then double-click
Display
.
2. In the
Display Properties
window, click the
Settings
tab, and then click
Advanced
.
3. Click the
Monitor
tab, and then click
Change
.
4. When the
Update Device Driver Wizard
dialog box appears, follow the steps in the previous paragraph.
First determine the Windows 95 version installed on your computer by right-clicking the
My Computer
icon on
the desktop and selecting
Properties
. The version number is listed under
System
. Perform the steps for the
appropriate version.
1. Click
Start
−
> Settings
−
> Control Panel
and then double-click
Display
.
2. In the
Display Properties
window, click the
Settings
tab and then click
Change Display Type
.
3. In the
Change Display Type
window, click
Change
and then click
Have Disk
.
4. Insert the monitor CD into the CD-ROM drive, type
d:\
(change the drive letter to match your CD-ROM
drive if it is not drive D) in the
Copy manufacturer’s files from:
box, and click
OK
.
5. In the
Select Device
window, click the appropriate monitor model and then click
OK
.
6. In the
Change Display Type
window, click
Close
.
7. In the
Display Properties
window, click
OK
.
1. Click
Start
−
> Settings
−
> Control Panel
and then double-click
Display
.
2. In the
Display Properties
window, click the
Settings
tab and then click
Advanced Properties
.
3. In the
Advanced Display Properties
window, click the
Monitor
tab and then click
Change
.
4. In the
Select Device
window, click
Have Disk
.
5. Insert the monitor CD into the CD-ROM drive, type
d:\
(change the drive letter to match your CD-ROM
drive if it is not drive D) in the
Copy manufacturer’s files from:
box, and click
OK
.
6. In the
Select Device
window, click the appropriate monitor model and then click
OK
.
7. In the
Advanced Display Properties
window, click
Close
.
8. In
the Display Properties
window, click
OK
.