


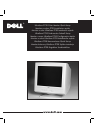


Before contacting Customer Service, please
refer to the Guide on CD-ROM
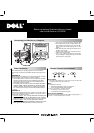
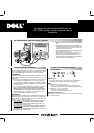
Connecting your Monitor to a Computer
1.Turnoffyourcomputerandunplugitspowercable.
2. Connect the blue connector of signal cable to the
blue video port on the back of your computer. Be
sure to tighten jack screws finger tight. Do not over-
tighten.
3.Fullyinsertthepowercableintothepowerporton
the back of the monitor.
4. Plug the power cables of your computer and your
monitor into a nearby outlet.
5. Turn on your computer and monitor. If the monitor
does not display an image please go to the trouble
shooting section of this guide.
Driver Installation Monitor Controls and Indicators
When prompted by the operating system for the monitor drivers,
insert the CD and select the CD -ROM as the disk containing the driv-
ers.
WINDOWS 98
Windows 98 will auto-detect the new monitor and start the “Add New
Hardware Wizard” if the drivers are not already installed.
S Click the NEXT button to search for drivers. Check the CD-ROM
drive box to install the drivers of the CD-ROM and click NEXT.
Confirm Windows found the drivers on the CD-ROM and click
NEXT again to install the drivers.
S To manually install or update the driver, click START, SETTINGS,
CONTROL PANEL, DISPLAY SETTINGS tab, ADVANCED, MON-
ITOR tab, CHANGE. This will start the “Update Device Driver Wiz-
ard”. Follow the same steps as the “Add New Hardware Wizard”
above.
WINDOWS 95
To determine the Windows 95 version, right click on the “My Comput-
er” icon on the desktop and select “Properties”. The version number
is listed under th e “System” section.
S Version 4.00.950A
--- Click on START, SET TINGS, CONTROL PAN-
EL,DISPLAY,SETTINGStab,CHANGEDISPLAYTYPE,CHANGE,
HAVE DISK, type the CD -ROM drive letter in the box and click OK.
S Version 4.00.950B
--- Click on START, SET TINGS, CONTROL
PANEL, DISPLAY, ADVANCED PROPERTIES, MONITOR tab, HAVE
DISK, type the CD -ROM drive letter in the box and click OK.
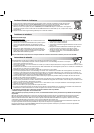
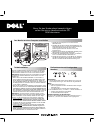
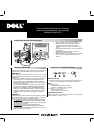
Power Switch
1. Push the power switch to turn the monitor on and off. The indica-
tor light up green when the monitor is on
Menu
2. Displays the menu and
S activates a highlighted function for adjustment
S returns the menu display after adjustment
3. Plus (+) and minus (--- ) buttons are used
S for selection of an item in the menu
S for adjustment of an activated property
Direct access adjustment
You may call contrast adjustment to the screen by pushing plus (+)
or minus (---) without having menu on screen.