


32
Hardware Installation
Installing the PERC S300 Adapter
NOTE:
The procedure to open a system and add parts might vary from system to
system. For more information, see the Hardware Owner's Manual of the system on
the Dell Support website at support.dell.com/manuals.
1
Unpack the PERC S300 Adapter and check it for damage.
NOTE:
If the PERC S300 Adapter is damaged, contact Dell Support at
support.dell.com.
2
Turn off the system and attached peripherals. Disconnect the system
power cable from the electrical outlet. See the system’s
Hardware Owner’s
Manual
or
User’s Guide
on
support.dell.com/manuals
for more information
about power supplies.
3
Disconnect the system from the network and remove the cover of the
system. See your system’s
Hardware Owner’s Manual
or
User’s Guide
for
more information on opening the system.
4
Select an appropriate PCI-E slot. Remove the blank filler bracket on the
back of the system aligned with the PCI-E slot you have selected.
NOTE:
Insert the controller into a slot that has at least eight PCI-E lanes for
optimum performance.
NOTE:
Insert the controller into a slot with a PCI-E x8 or larger physical
connector.
NOTE:
For more information about your system’s PCI-E slots, see your
system’s Hardware Owner’s Manual or User’s Guide on the Dell Support
website at support.dell.com/manuals.
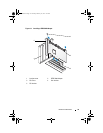
5
Align the PERC S300 Adapter to the PCI-E slot you have selected.
6
Insert the controller gently, but firmly, until the controller is firmly seated
in the PCI-E slot. See Figure 4-1.
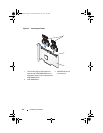
7
Tighten the bracket screw, if any, or use the system’s retention clips to
secure the controller to the system’s chassis.
NOTE:
If you are attempting to install a Modular PERC S300 refer to the
platform documentation for help with the installation.
A5_bk0.book Page 32 Thursday, February 10, 2011 8:34 PM