


Installing System Components 75
Removing the I/O Panel Assembly
1
Turn off the system and attached peripherals, and disconnect the system from the electrical outlet.
2
Open the system. See "Opening the System" on page 41.
3
Remove the heat sink and shroud assembly. See "Removing the Processor" on page 62. Do not remove
the processor, however.
4
Remove the processor cooling fan. See "Removing the Cooling Fans" on page 65.
5
Remove the front bezel. See "Removing the Bezel" on page 73.
NOTICE: Carefully note the routing of each cable before you disconnect it, so that you are sure to re-route cables
correctly.
6
Disconnect the I/O panel ribbon cable from the I/O panel connector by pulling the yellow cable loop.
7
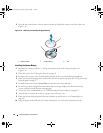
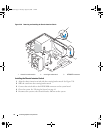
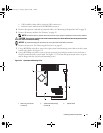
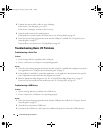
Remove the mounting screw holding the I/O panel assembly to the front chassis. See Figure 3-22.
8 Lift the I/O panel assembly out of the system.
Figure 3-22. Removing and Installing the I/O Panel Assembly
1 I/O panel assembly 2 I/O panel ribbon cable 3 holding tab on the chassis
4 screw on the I/O panel
1
4
2
3
book.book Page 75 Tuesday, August 25, 2009 1:14 PM