


L
AMINATING
WITH
R
OLL
F
ILM
PHOENIX 44 LAMINATOR
Refer to the instruction sheet packed with
each box for specific information on the roll
film you are using. We recommend
using low temperature adhesives on
either a 3 or 5 mil construction.
The Phoenix is designed for roll films to
laminate one side of a print, over-laminate
a mounted print, or simultaneously mount
and laminate using heat activated board.
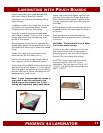
If you are laminating one-side of a print,
place your print on a sled or non-stick
board. Phoenix sleds are all 3/16” thick.
We recommend starting with the tempera-
ture to the ‘Roll’ setting and the Speed to
the ‘Rabbit’ setting.
If you are simultaneously mounting
and laminating using a heat activated
board, we recommend using boards
which use a low temperature
adhesive (i.e. below 160ºF). Set the
temperature to ‘Pouch’ and the speed
to the ‘Rabbit’ setting.
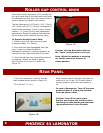
1. Set the Control Knob to the 3/16”
thickness setting.
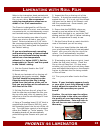
2. Mount you laminate roll on the top roll
dispensing bar/supply mandrel. Note:
The Roll should be mounted on the
Phoenix such that the film is being
pulled from the bottom of the roll so
that you are looking at the adhesive or
dull sized of the film.
3. Pull the film from the roll, place it be-
hind the idler bar and drape the film over
the top roller and roller nip opening (the
adhesive on the film should begin to ’wet-
out’ or activate.
4. Using a Threading board (3/16” thick is
supplied with the Phoenix Roll Kit), push
the threading board into the nip of the roll-
ers. Turn the Motor control on and select
either the ‘Rabbit’ or ‘Turtle’ speeds. The
threading board will be automatically
pulled through the Phoenix with your roll
film.
5. Inspect the film on the top roll of the
Phoenix. It should be smooth and taught
against the roll. If it is not, pull the thread-
ing board on the back of the Phoenix until
the film smooths out. Once smooth, you
are ready to laminate.
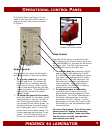
6. Ensure that the PHOENIX rollers are
turned on and set either at the ‘Rabbit’
speed. With the Heat is on, set at the ‘Roll’
setting and the LED light is Yellow indicating
the roll temperature is ready to use.
7. Set the Control Knob to match the thick-
ness of the board you will be using.
8. Insert your board (either the sled with
your print/mounted print/or heat activated
board. with your print into the nip of the
rollers. It will automatically be pulled
through the laminator and over-laminated.
9. If laminating more than one print, insert
it after the first print is done. Check the
film on the roll face first. If it has some
wrinkles, pull you first print unit they disap-
pear and adjust the tension on the dispens-
ing bar to maintain the film being smooth
on the roll face.
10. Trim your print after it exits the Phoe-
nix.
Note: If your laminate appears cloudy
or your print is not fully adhered to the
board, adjust the speed to the ’Turtle’
setting and reprocess your pouch
board.
Caution: Do not trim near the rollers.
Cuts and nicks in the roller can effect
the quality of your laminating and re-
quire maintenance. Cuts and nicks in
the roll face are not covered by the
Warranty.
13