


Hubport Installation Guide (90000664 Rev. C) – Page 2
Specifications
Product
USB2.0
High
Speed†
Powering
Method
USB
Downstream
Ports
Power
Requirements
Hubport/4
No
Self*
4
5VDC @2A
Hubport/4c
Yes
Self*
4
5VDC @2A
USB Bus
2
None
Hubport/4c DC
Yes
Self*
4
Variable 10 - 28VDC @15W
Hubport/7
No
Self*
7
5VDC @3A
Hubport/7c
Yes
Self *
7
5VDC @3A
Hubport/7c DC
Yes
Self*
7
Variable 10-28DC @24W
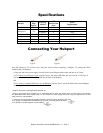
Connecting Your Hubport
Type A Type B
Note that Windows NT 4.0 users must install the drivers before connecting a Hubport. To connect the cables
included with your Hubport:
1) Plug one end of the power supply* into the back of your Hubport and the other end into an AC outlet.
2a) To connect your Hubport to a PC, plug the Type A end of the USB cable into one of the PC’s USB Type A
slots and the Type B end of the USB cable into the back of the Hubport.
OR
2b) To connect a standard USB device to your Hubport, plug the Type A end of the USB cable into the Hubport
and the Type B end into the device.
† USB 2.0 High Speed is not supported by Windows 98.
* Power to this product may be supplied by a UL Listed Direct Plug-In Power Unit marked “Class 2” with a minimum rating listed in
the Specifications table above if used in the U.S. and Canada or a power supply with similar rating and approved by your local
safety code if it is used elsewhere.
1. Some units may be equipped with a pigtail connection. Follow the polarity markings on the cable.
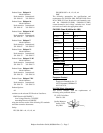
2. For polarity on Hubports with a threaded locking connector, use center positive as follows:
3. For polarity on all other Hubports, use the following: