


DCM-100 Ethernet Cable Modem
Installation
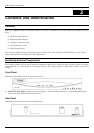
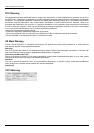
The installation of the DCM-100 Ethernet Cable Modem can be completed in a matter of minutes. Be careful to
insure the cables are properly locked into position. Follow these steps (see the figure of the rear panel in Chapter
Two):
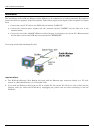
1. Connect the coaxial TV cable to the DCM-100 jack labeled “CABLE IN.”
2. Connect the external power adapter into the connector labeled “POWER” and the other end to the
electrical outlet.
3. Connect one end of the 10BASE-T Ethernet cable (Category 5 or better) to one of your PC’s Ethernet ports
and the other end into the DCM-200 connector labeled “ETHERNET.”
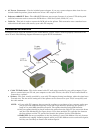
Your setup should look something like this:
Important Notice:
♦ The DCM-100 Ethernet Cable Modem will work with the Ethernet port connected directly to a PC, hub,
switch, or a Broadband Router ( i.e. DI-704,DI-713P)
♦ If you shift the Ethernet cable from one PC to another PC, the second PC will not be able to link onto the
Internet until you reboot the DCM-100 by unplugging the power cord and then reinserting it into the
DCM-100.
8