


Internet Server Setup 23
Using Your Own Address Settings
If your LAN is already setup for IP networking and you wish to
change the IP address of the internet server to operate within your
existing IP network, simply:
1. Physically connect the internet server to your LAN and power it on.
2. Configure one computer on your network to have the IP address of
192.168.100.2 (or any unique IP address in the 192.168.100.XXX domain)
and a subnet mask of 255.255.255.0. Please note the original IP settings of
the computer before changing them. Restart the computer.
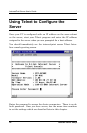
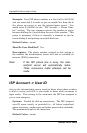
3. Run Telnet and connect to the internet server through its default address of
192.168.100.1.
4. When prompted for the password on the opening screen, press the <Enter>
key. There is no default password.
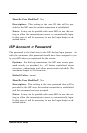
5. In the Main Menu choose System Configuration.
6. In the System Configuration window choose Local LAN -> IP Address and
type in the IP address you wish to assign to the internet server.
7. Also in the System Configuration window choose Local LAN -> Subnet Mask
and enter the correct subnet mask. Hint: If left blank, the internet server will
automatically assign the standard subnet mask for Class A, B or C IP ad-
dresses.
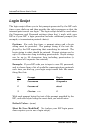
8. Press to return to the main menu.
9. Press to Save Configuration settings. The internet server will automatically
save the new settings and reboot, disconnecting your telnet session. When
it comes online again, the new settings will be in effect.
10. Change the IP address and subnet mask of the computer back to their original
configuration. Reboot the computer.
We recommend that you make a note of each device’s IP address for
reference during troubleshooting or when adding new stations or de-
vices.