


2
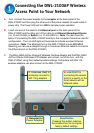
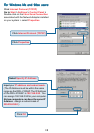
A. Receptor for
Power Adapter.
B. LAN PORT for
connecting the access
point to a switch on the
local network with an
ethernet cable
A.
First, connect the power adapter to the receptor at the back panel of the
DWL-2100AP and then plug the other end of the power adapter to a wall outlet or
power strip. The Power LED will turn ON to indicate proper operation.
B. Insert one end of the cable to the Ethernet port on the back panel of the
DWL-2100AP and the other end of the cable to an Ethernet Broadband Router
(i.e., D-Link DI-604) or Switch (i.e., D-Link DSS-5+). Note: You also have the
option of connecting the DWL-2100AP directly to the computer that will be used for
configuration. The Link LED light will illuminate to indicate a proper Ethernet
connection. (Note: The Ethernet Port on the DWL-2100AP is Auto-MDI/MDIX.
Meaning you can use a straight-through or crossover-Ethernet cable to connect to
the Ethernet port on the DWL-2100AP.)
C. The DWL-G650 AirPlus Xtreme G Wireless Cardbus Adapter and the DWL-G520
AirPlus Xtreme G Wireless PCI Adapter will connect, out of the box , with the
DWL-2100AP, using their default wireless settings. Computers with 802.11b
wireless adapters can also connect to the DWL-2100AP.
Connecting the DWL-2100AP Wireless
Access Point to Your Network
C. Antennas Used to
wirelessly connect to
802.11b/g adapters.
Reset Button
Pressing this button restores
the Access Point to its original
factory default settings.