


Power Wash 250™
©Elation Professionals® Los Angeles, Ca. - wwww.ElationLighting.com - Page 30
6.2 Removing the Lamp
6.2.1 Be sure the unit is disconnected from it’s main power supply.
6.2.2 Remove the 3 retaining Phillips screws that secure the lamp cover to fixture
chasis.
6.2.3 Once the lamp cover is free, expose the lamp by gently pull out the lamp socket
assembly.
6.2.4 Gently remove the old lamp from it’s socket. If the old lamp has exploded be sure
to remove all of the old lamp fragments to prevent damage to the internal
components.
6.2.5 Replace the lamp with an approved replacement type. Be sure to follow all the
lamp handleing procedures included with your new lamp. Never handle the new
lamp with your bare hands, the oils from your skin may damage the lamp. Always
replace with the lamp with a lamp that meets the orginal lamp specification,
failure to do so may damage the unit and will void your manufactures warranty.
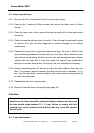
6.2.6 Before reassembing the unit, be sure to adjust the lamp distance from the main
lens. The optimum distance between the lamp and the lens is between 1.0-1.5
mm. Use the optimization screws located on the outer socket casing marked [A]
to make this adjustment.
6.2.7 Reassemble the unit in reverse order.
6.2.8 Besure to reset the lamp running time (see page 19).
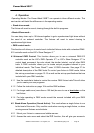
Attention:
Be sure the lamp is securely seated in the lamp socket. Also pay close
attention to the lamp orientation, optimum distance between the lamp and
the lens should range between 1.0 - 1.5 mm. Failure to comply with this
warning may cause excessive heat build-up that may cause the internal
lens to crack.
6.3 Lamp Optimization