


Click View Reference Guide to view the electronic
manual. To copy it to your hard disk and view it from
there, click Install Reference Guide and follow
the instructions.
When you’re finished, close your browser
and click Quit.
Click Exit to exit the installer.
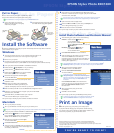
Install the Software
Install the Software
Locate the CD-ROM that came with your printer and carefully follow the steps here to install the
printer software on your system.
Turn off your printer. Then turn on your computer and wait until you see
your desktop icons and the cursor is no longer an hourglass style.
Now turn on your printer.
You may see a screen informing you that Windows has detected your printer
(except on Windows NT). If so, click Cancel. You can’t install your printer software that way.
Windows
1
2
4
3
5
6
7
8
9
10
Insert your printer software CD-ROM in a CD-ROM or DVD drive.
Double-click the My Computer icon on your desktop.
Double-click the EPSON CD-ROM or DVD icon.
Double-click the EPSON icon to start the installer.
(Don’t select any other icon in the folder.)
Read the license agreement and click Agree.
You see the Main Menu.
Click Install Printer Driver. You see the printer driver
installation screen.
Make sure your printer model is highlighted,
then click OK. The installer copies files to your
computer and displays a series of windows on your screen.
When it’s finished, click OK. You see the EPSON Product Registration screen.
Follow the on-screen instructions to register your printer with EPSON.
At the last screen, click Done.
At the Main Menu, click Exit and restart your computer.
Leave in the CD-ROM as your computer restarts.
Now you’re ready to install your photo software and electronic manual.
11
12
13
Turn on your printer, if necessary.
Turn on your Macintosh and wait until you see your desktop icons.
Macintosh
If you see a message telling you that you need to install software for a USB device, click OK.
1
2
4
3
5
6
7
Insert your printer software CD-ROM in a CD-ROM or DVD drive.
Double-click the EPSON icon in the CD-ROM folder.
(If your CD-ROM folder doesn’t open automatically,
double-click the EPSON icon on your desktop.)
Read the license agreement and click Agree.
You see the Main Menu.
Click Install Printer Driver.
At the next screen, click Install. Follow the instructions
to install your printer driver, select a default paper size,
and restart your Macintosh.
If you don’t have an Internet browser, such as
Netscape Navigator
™
or Microsoft
®
Internet Explorer
(versions 3.0 or later), you won’t be able to view the
electronic manual. See your Printer Basics book
for details.
To share your printer over a PC or Macintosh network, see the
electronic Reference Guide for configuration instructions.
After rebooting your system, do one of the following:
Windows: Double-click the EPSON icon.
You see the Main Menu.
(You may have to double-click My Computer
and the EPSON CD-ROM icon to see the
EPSON icon.)
Macintosh: Double-click the EPSON icon
in the EPSON CD-ROM folder.
You see the Main Menu.
Click Install Photo Software. You see a submenu.
Select the button for the software you want to install.
Then click the Install button and follow the
instructions on the screen. (If the menu closes after you
install an application, repeat step 1 and 2 to continue
installing other applications.)
Install Photo Software and Electronic Manual
Now you’re ready to print with your EPSON Stylus Photo printer!
On the EPSON Stylus Photo 1280, you’ll need to enter a serial number for Adobe
®
Photoshop
®
LE when you install it. The serial number is on your CD-ROM sleeve.
1
2
3
4
5
6
7
Now that you’ve set up your printer, you’re ready to print.
If you print without changing any of the printer software settings,
your printer is set to print at 360 dpi. To obtain better resolution and
colors from your printer, see your Printer Basics book.
Print an Image
EPSON and EPSON Stylus are registered trademarks of SEIKO EPSON CORPORATION.
General Notice: Other product names used herein are for identification purposes only
and may be trademarks of their respective owners. EPSON disclaims any and all rights in those marks.
Copyright © 2001 by Epson America, Inc.
Printed on recycled paper. 1/01 CPD-11717
EPSON Stylus
®
Photo 890/1280
EPSON Stylus
®
Photo 890/1280
YOU’RE READY TO PRINT!
When you’re finished installing software,
click Back to return to the Main Menu.
Now click View EPSON Documentation.
You see this submenu:
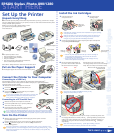
Put In Paper
Pull out the output tray extensions.
Slide the left edge guide so it’s slightly
wider than your paper.
1
Load paper against the right edge guide,
then slide the left edge guide against it.
2
Don’t load
paper above
this arrow
Output tray
extensions
Left edge
guide
Put in Paper
You can load a stack of plain paper or special ink jet paper.
See the Printer Basics book for special paper loading steps.
For information on using roll paper, see your Printer Basics book.
Now you’re ready to install your photo software and electronic manual.
Open the Chooser from the Apple menu.
Click the SP 890 or SP 1280 icon, then click your USB port icon.
Turn on background printing, if you want.
Close the Chooser. Leave in the CD-ROM.
9
10
11
If you choose to print a registration form, you’ll need to select your printer
in the Chooser (described in the next steps) before your form will print.
After restarting, you see the EPSON Product Registration screen.
Follow the on-screen instructions to register your printer with EPSON.
At the last screen, click Quit.
8
continued