


5. Lift up the black ink cartridge clamp.
6. Place the black ink cartridge in its holder with the
label facing up and toward the back of the printer.
Then press down the clamp until it locks into place.
If ink gets on your hands, wash them
thoroughly with soap and water. If ink gets in
your eyes, flush them immediately with water.
7. Press the cleaning button to move the color ink
cartridge holder into loading position.
8. Repeat steps 5 and 6 to install the color ink cartridge.
9. Press the
cleaning button to begin charging the
ink delivery system and then close the printer cover.
Charging takes about two minutes. The
power
light flashes and the printer makes various sounds
until it’s finished. Don’t turn off the printer or
interrupt the charging process or it will start over,
using more ink than necessary. Charging is finished
when the
power light stops flashing and stays on.
Never turn off the printer while the power
light is flashing, unless the printer hasn’t
moved or made any noise for more than
5 minutes.
3 Install the Ink Cartridges
1. Plug the printer’s power cord into a grounded outlet.
Don’t use an outlet that can be turned off by
a wall switch or timer, or one on the same
circuit as a large appliance.
2. Unwrap the ink cartridges. Then remove only the
yellow part of the tape seal on top, as shown. Don’t
pull off the blue portion or remove the clear seal on
the bottom of the cartridge.
Use the ink cartridges packed with your
printer the first time you install them or your
printer won’t charge ink properly. You must
remove the yellow tape seal from the
cartridge.
3. Lower the printer’s output tray and open the cover.
4. Press the power button to turn on the printer. The
power light flashes and the black and color
ink out lights come on. The black ink cartridge
holder moves slightly left to the loading position.
Always use the power button to turn the
printer on or off. Never use an external
switch, such as on a power strip.
4 Load Paper
1. Open the output tray extensions. Slide the left edge
guide right until it is a little wider than your paper.
2. Load a stack of plain paper with the printable side up
and place it against the right edge guide. Then slide
the left edge guide up against the paper’s left edge.
Don’t load paper higher than the arrow on the guide.
5 Connect the Printer
Make sure your cable meets the specifications listed in
Printer Basics.
Connecting to a USB Port (Recommended connection,
for Windows 98
®
or iMac
™
only)
1. Turn off the printer and computer.
2. Connect square end of the USB cable to your
printer’s USB connector and the other end to your
computer’s USB connector or USB hub.
Open to continue
1 Set up the printer
1 Set up the printer
1 Unpack the Printer
Remove any tape and packing material from the printer as
described on the unpacking sheet in the printer box. Make
sure you’ve got a cable to connect the printer to your
computer, and these items:
Place the printer near your computer and an available
grounded outlet, but avoid areas:
■ with high temperature or humidity
■ in direct sunlight or dusty conditions
■ with poor ventilation
■ near sources of heat or electromagnetic interference,
such as a cordless telephone base unit
Also be sure to check the System Requirements and follow
all the Safety Instructions in your Printer Basics book.
If you need help as you set up your printer, see
“Problem Solving” in the Printer Basics book.
2 Put on the Paper Support
Insert the paper support into the
slots at the back of the printer’s
sheet feeder.
If you’re using a USB hub, connect the
printer’s cable to the first tier of the hub or
the printer may malfunction. If the printer
doesn’t work with the hub, connect it
directly to the USB port.
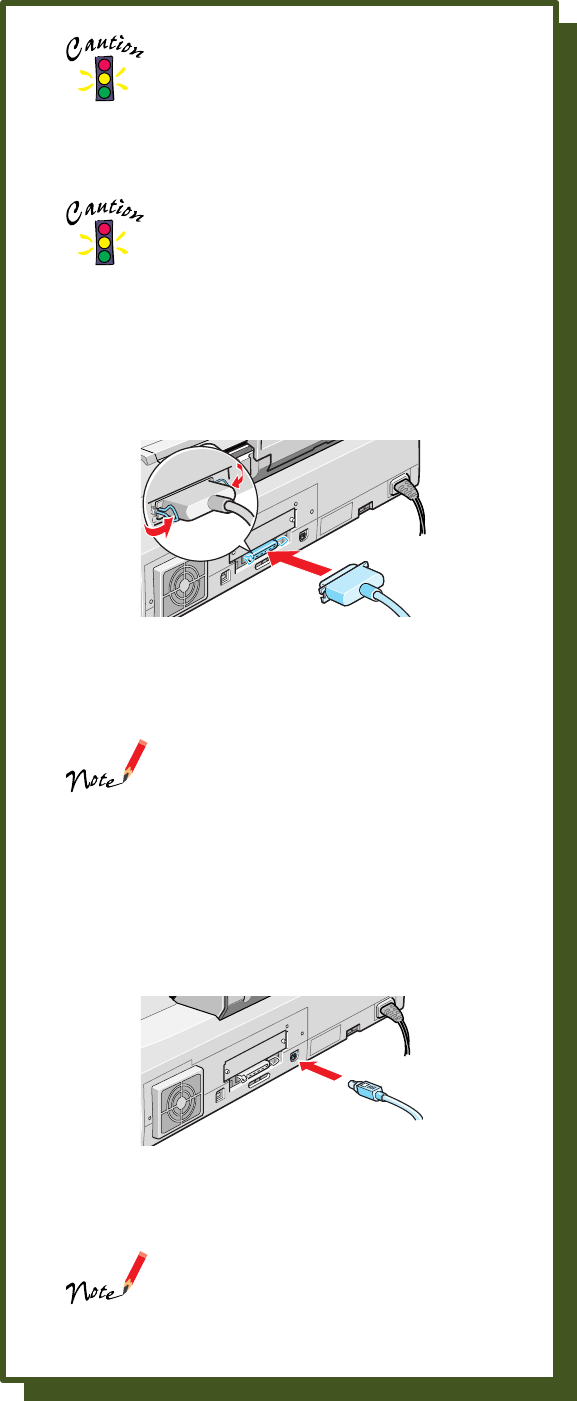
Connecting to a PC Parallel Port
To ensure your computer is capable of
matching your printer’s maximum speed,
your computer’s ECP/DMA mode should be
enabled. Information on these settings is
supplied by your computer manufacturer.
1. Turn off the printer and computer.
2. Connect the parallel cable to the printer’s parallel
connector, then fasten it with the wire clips.
3. Connect the other end of the cable to your
computer’s parallel connector (you can identify it
by shape) and secure it as necessary.
If your computer has multiple parallel
connections, connect your printer to the
main one (identified as LPT1 by your
system). To use a different port, see your
Windows documentation for instructions.
Connecting to a Macintosh Serial Port
1. Turn off the printer and Macintosh
®
.
2. Connect the cable to the printer’s serial connector.
3. Connect the other end of the cable to either the
modem or printer port on your Macintosh.
If you’re using a PowerBook
®
with a
combination printer/modem port, use that
port and set it to Normal. If your Macintosh
has an internal modem, use the printer port.
Load paper only up
to this arrow
Slide paper against
the right edge guide
2 Install the software
2 Install the software
Now that you’ve set up your printer, you can install your
software from the CD-ROM included with this card. The
CD-ROM includes:
■ the driver that lets you print
■ A Guided Printing Exercise and Polaroid
®
PhotoMAX
™
Pro software
■ your electronic EPSON Stylus COLOR 900 Manual
The Guided Printing Exercise and Polaroid
PhotoMAX Pro are not available with Windows 3.1
or Macintosh.
If you don’t have a CD-ROM drive, you can download the
drivers or order diskettes from EPSON. See “Ordering
Printer Software Diskettes” in the Printer Basics book.
Keep this card with you as you install your printer
software so you can refer to it when you need to.
Windows 95, 98, or NT 4.0 with
Parallel Connection
Make sure any virus protection programs are
turned off before you begin. For network
configuration instructions, see your Printer Basics
book.
1. Make sure your printer and computer are connected
and turned off.
2. Turn on your computer and wait until you see the
icons on your Windows desktop.
3. Turn on your printer and wait until the
power light
stops flashing.
IMPORTANT:
If at any time you see a screen telling you that Windows
has detected your printer and asking you to install a driver
diskette, ALWAYS select Cancel. You can’t install your
software that way.
4. Insert your printer software CD-ROM.
5. Click
Start, select Run, and type D:\EPSON (where
D is your CD-ROM drive letter). Then click OK. Read
the license agreement and click
Agree.
color cartridgeblack cartridge
color ink cartridge
printer
paper support
printer software
CD-ROM
black ink cartridge
Printer
Basics
book
EPSON
®
Photo Paper Pack