3 Click Install and follow the on-screen instructions.
4 When you see this screen, click the first option and then click Next,
unless the CX9400Fax Series is connected to your computer through an
external print server.
If you’re using an external print server, click the second option,
click Next, then skip to step 6.
5 When prompted, connect the USB cable. Use any open USB port on
your computer.
Note: If installation doesn’t continue after a moment, make sure you
securely connected and turned on the CX9400Fax Series.
6 When you’re done, remove the CD.
You’re ready to print, copy, scan, and fax! See your Quick Guide or on-screen
User’s Guide.
Macintosh
®
1 Insert the CX9400Fax Series
software CD.
2 Double-click the Epson icon.
3 Click Install and follow the on-screen instructions.
4 When prompted, connect the USB cable. Use any open USB port on
your computer. Make sure the CX9400Fax Series is securely connected
and turned on.
Epson and Epson Stylus are registered trademarks, Epson Exceed Your Vision is a trademark, and
Supplies Central is a service mark of Seiko Epson Corporation. DuraBrite is a registered trademark
of Epson America, Inc.
General Notice: Other product names used herein are for identification purposes only and
may be trademarks of their respective owners. Epson disclaims any and all rights in those marks.
This information is subject to change without notice.
© 2008 Epson America, Inc. 1/08 CPD-24115R1
Want great results? Simple. Use genuine Epson paper and ink. For the right
supplies at the right time, you can purchase them at Epson Supplies Central
SM
at www.epson.com/ink3 (U.S. sales) or www.epson.ca (Canadian sales).
You can also purchase supplies from an Epson authorized reseller. To find the
nearest one, call 800-GO-EPSON (800-463-7766).
Premium Presentation Paper Matte
Ultra smooth, non-glare, heavy-weight paper
for long-lasting photos and professional-looking
brochures. See the entire line of Epson photo
papers at Epson Supplies Central.
Genuine Epson Inks
Look for the numbers below
to find your cartridges. It’s as easy as
remembering your number!
Black
Magenta
Cyan
Yellow
Try the High Capacity 68 black cartridge available at
www.epson.com/highcapacity (U.S. sales) or
www.epson.ca (Canadian sales) or at your local reseller.
Need paper and ink?
Epson
®
CX9400Fax Series Ink Cartridges
High Capacity 68 black cartridges are also
available at www.epson.com/highcapacity (U.S.
sales) or www.epson.ca (Canadian sales) or at
your local reseller.
69
69
69
69
Black
Cyan
Magenta
Yellow
Install software
Your software works with Windows
®
2000, XP, XP Professional x64 Edition,
Windows Vista
®
, and Mac OS
®
X 10.2.8, 10.3.9, 10.4.x, or 10.5.x.
Windows
1 Make sure the CX9400Fax Series is NOT CONNECTED to
your computer.
Note: If you see a Found New Hardware screen, click Cancel and
disconnect the USB cable. You can’t install your software that way.
2 Insert the CX9400Fax Series software CD.
With Windows Vista, if you see the AutoPlay window,
click Run Epsetup.exe. When you see the User Account Control
screen, click Continue.
To use the CX9400Fax Series for faxing, connect the included phone cord
from a telephone wall jack to the LINE port on the CX9400Fax Series.
To connect a telephone or answering machine, see the Quick Guide for
instructions.
Note: If you’re connecting to a DSL phone line, you must use a DSL filter or
you won’t be able to fax. Contact your DSL provider for the necessary filter.
Any questions?
Quick Guide
Basic instructions for printing, copying, scanning, and faxing.
On-screen Epson Information Center
Click the desktop shortcut for easy access to the CX9400Fax Series User’s
Guide, FAQs, online troubleshooting advice, and software downloads. You
can also purchase paper and ink.
On-screen help with your software
Select Help or ? when you’re using your software.
Epson Technical Support
Internet Support
Visit Epson’s support website at epson.com/support and select your
product for solutions to common problems. You can download drivers and
documentation, get FAQs and troubleshooting advice, or e-mail Epson with
your questions.
Speak to a Support Representative
Call (562) 276-4382 (U.S.) or (905) 709-3839 (Canada), 6
AM to 6 PM, Pacific
Time, Monday through Friday. Days and hours of support are subject to
change without notice. Toll or long distance charges may apply.
Software Technical Support
ArcSoft PhotoImpression
®
(510) 440-9901
www.arcsoft.com
ABBYY
®
FineReader
®
Sprint Plus
(510) 226-6717
www.abbyyusa.com
support@abbyyusa.com
Cut out the card to the right
and keep it with you when
purchasing replacement ink
cartridges.
Printed in XXXXXX
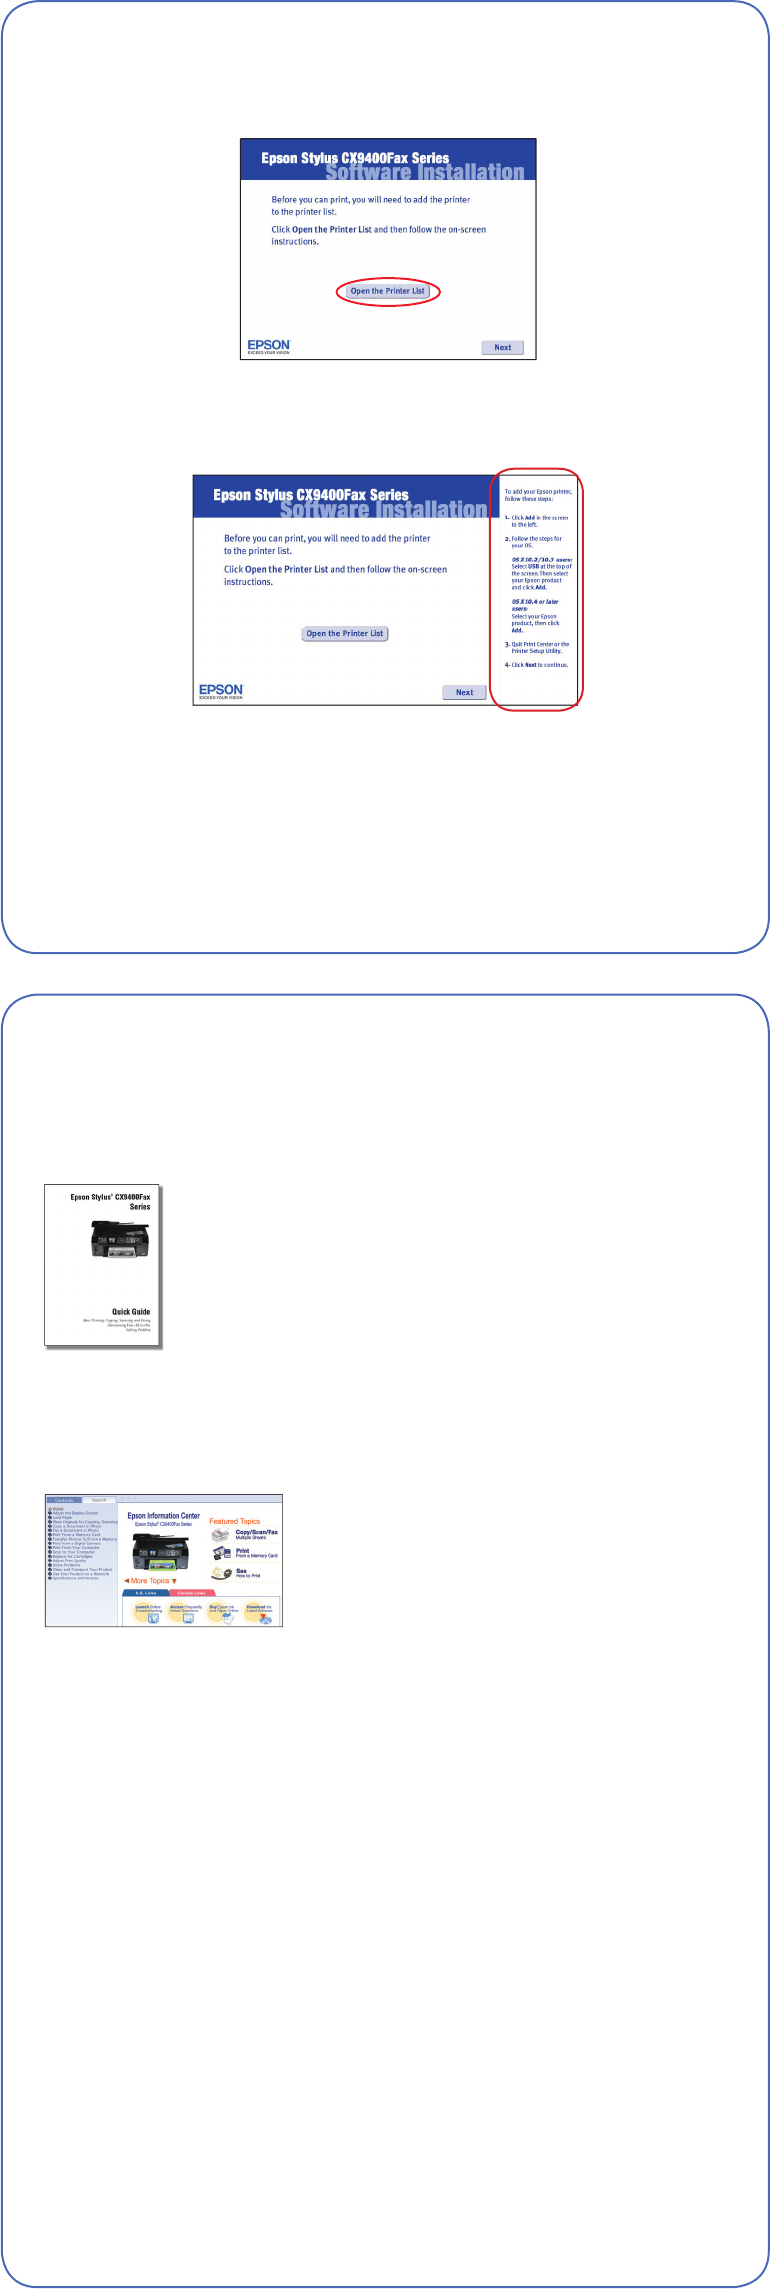
5 Mac OS X 10.5 users: skip to step 9. Other users: continue with step 6.
6 When you see this screen, click Open the Printer List.
7 Follow the steps on the right side of the screen to add the
CX9400Fax Series.
8 Click Next again, if necessary.
9 When you’re done, eject the CD.
You’re ready to print, copy, scan, and fax! See your Quick Guide or on-screen
User’s Guide.
Connect the phone cord
6
7
4113833 Rev.0
1-B C
4113833 Rev.0
1-B M
4113833 Rev.0
1-B Y
4113833 Rev.0
1-B K
