821/81/61 Quick Reference Guide English-02-03
Adjustments
Turning the Projector Off
Turn off the power for all sources connected to
the projector.
1
When the cool-down is complete, a "pip-pip"
confirmation buzzer will sound, and the Power
indicator will change to light orange.
Press twice to turn off the power.
The Power indicator will flash orange (cool-down in
progress/about 20 seconds).
If a message prompting you to clean or replace the air
filter appears, follow the instructions in the message.
2
3
User's Guide
"Adjusting the Screen Image"
User's Guide
"Turning Off the Projector"
Turn off the power for both the projector and the video source before connecting them.
Connecting to a Video Source
User's Guide
"Connecting to a Video Source"
Preparation before Projecting
User's Guide
"Turning On the Projector"
If connecting a component video source (such as a DVD player), you can use the optional
component video cable to connect the source to the Computer/Component Video port at the
rear of the projector.
If no images are projected, change the
input signal.
Tip
Tip
The following adjustments can also be made.
Auto Setup (only when computer or RGB video signals are being projected)
User's Guide "Adjusting Computer Images and RGB Video Images"
When
projecting computer images, the input signals are detected automatically and adjusted
so that the optimum images are projected. If the results of automatic adjustment are not
satisfactory, individual settings can also be adjusted manually using the menus.
Other adjustments User's Guide "Using the Configuration Menu Functions"
Press on either the remote control or the projector to display the Configuration menu.
You can use the configuration menu functions to adjust setting such as brightness, contrast
and colour.
Tip
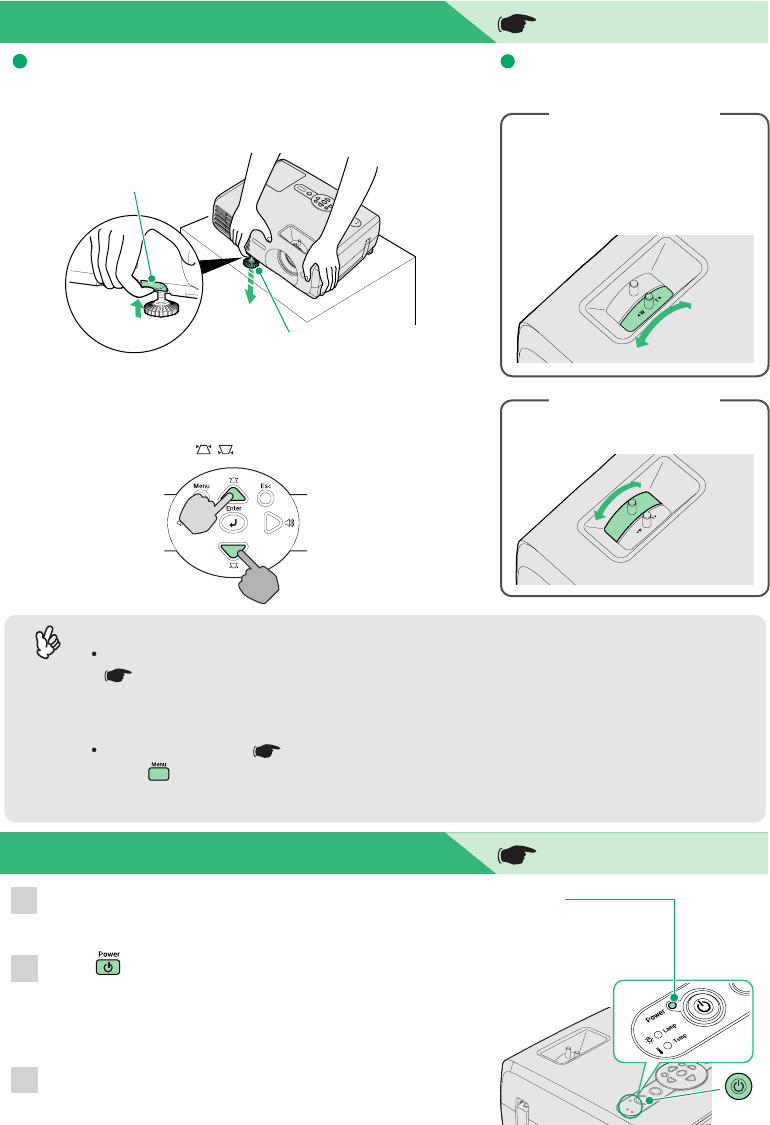
When the projector is tilted, it will cause keystone distortion to
appear in the image, but this distortion can be corrected using the
automatic keystone correction function as long as the vertical
angle of tilt is within a range of approximately 15˚. If you would like
to make further minor adjustments to the result of automatic
keystone correction, use on the projector's control panel.
* To play sound through the projector's built-in speaker, use the audio adapter (supplied with the
projector) to connect an A/V cable (commercially available) to the [Audio] input port corresponding to
the connected video source.
Power indicator
Adjusting the image
size and focus
Operating problems may occur
if the power cable is
disconnected while the Power
indicator is flashing orange.
S-Video cable (commercially-available)
[Audio] port [Video] port (yellow)
[S-Video] port
To S-Video
output port
Foot adjust lever
Front adjustable foot
If connecting to a computer with a built-in
monitor, or to a laptop computer, you
may need to change the output
destination using the buttons or setting
menus on the computer or laptop
computer.
User's Guide "Turning On the Power and
Projecting Images"
Adjusting the image angle
Turn the focus ring to adjust the
focus.
Turn the zoom ring to adjust the
image size.
Turn to the "W" side to increase
the image size, and turn to the "T"
side to reduce the image size.
Fine adjustments to
image size
Adjusting the focus
To video
output port
To audio
output port
Projector
Remove the lens cover.
Insert the projector's power cable into
the projector.
2
Insert the power cable into an earthed
electrical outlet.
The Power indicator will light orange.
3
Turn on the power for the signal input
source.
For video equipment, press [Play] to start
playback.
4
5
Press to turn on the projector's
power.
A beep will sound to indicate that the projector
is starting up.
The Power indicator will flash green, and
projection will then start (warm-up in progress).
The Password Protect setting may cause the
password entry screen to be displayed each
time the power is turned on.
If this happens, enter the password.
User's Guide "Preventing theft (Password
Protect)"
When the "Extended" - "Operation" - "Direct
Power ON" menu item is set to "ON", a
confirmation buzzer sounds and the projector's
power turns on as soon as the power plug is
inserted into the electrical outlet, and projection
then starts.
User's Guide "Extended" Menu
1
2
3
5
While pulling the foot adjust lever, lift up the front of the projector
so that the front adjustable foot can extend.
To retract the front adjustable foot, gently push down on the
projector while pulling the foot adjust lever.
Power indicator
Remote control
A/V cable
(commercially-available)
[Audio] port
When connecting to a
video source with an
S-Video output port
When connecting to a video
source with a video output port
yellow
white
white
yellow
red
red
To [Audio] port
Connect the cable
using the audio
adapter that is supplied
with the projector.
1


