


EPSON Stylus COLOR 760
8/99 EPSON Stylus COLOR 760
- 5
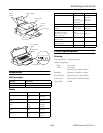
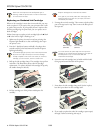
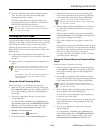
3. Lift up the two ink cartridge clamps.
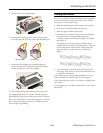
4. Unwrap the ink cartridges, then remove only the yellow
part of the tape seal on the top. Don’t pull off the blue part.
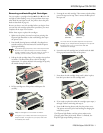
5. Insert both ink cartridges with the labels facing up as
shown. Press down the clamps until they lock into place,
but don’t press down on the ink cartridges.
6. Press the
R cleaning button and close the printer cover.
Ink charging takes about two minutes, with the
P power
light flashing and the printer making noise until it’s finished.
Don’t turn off the printer or interrupt charging or it will start
over, using more ink than necessary. It’s finished when the
P power light stops flashing.
Testing the Printer
You can run a printer check to determine whether a problem
comes from the printer itself or some other source. Follow
these steps to run the printer check:
1. Make sure both the printer and computer are turned off.
2. Disconnect the interface cable from the printer.
3. Make sure paper is loaded in the printer.
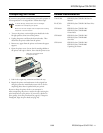
4. Hold down the
E load/eject button, then press and release
the
Ppower button. Continue holding down the
E load/eject button until the
Ppower light starts to flash,
then release it.
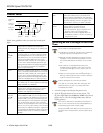
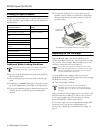
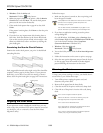
The printer prints one page showing its ROM version
number, ink counter, and a nozzle check pattern. Only the
nozzle check pattern is shown below. (If the pattern has
gaps in its dots, you need to clean the print head; see
page 9.)
5. To end the check, turn off the printer after it prints the
check page. Then reconnect the interface cable and turn on
your printer and computer.
If the check page prints, the problem probably lies in your
software settings, the interface cable, or your computer.
If the check page doesn’t print, you may have a problem with
your printer.
Try the suggestions in “Problems and Solutions” in the Printer
Basics book.
black cartridge color cartridge