


R4CE990
BasicOperationGuideRev. D
OPG.FM A4 size
4/27/04
L
Proof Sign-off:
M.Koike CRE Kusama
H.Kimura
editor name
8 Copying
Note:
❏ Do not pull the paper being copied out of this product.
❏ The copied image may not have exactly the same size
as the original.
❏ If the ink light flashes to indicate low ink while you
are copying, you can either continue making copies
until the ink runs out, or stop making copies and then
replace the ink cartridge.
Draft copying
You can copy a document or photo faster than with
standard copying using the draft copying function.
Note:
❏ The quality of the copy made with draft copying is not
as high as the quality of copies made with standard
copying.
❏ Draft copying is only possible when A4 and Plain
Paper are selected.
❏ To create a draft copy, other colors of ink are mixed
with black ink even when the original is a black and
white document.
1. Follow steps 1 to 5 in “Standard Copying” on
page 7.
2. Whilst pressing the
y Stop button, press the
x Start Color button to copy in color or the
x Start B&W button to copy in grayscale.
Borderless Copying
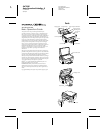
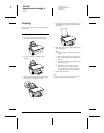
1. Follow the steps in “Loading Paper” on page 6.
2. Follow the steps in “Placing a Photo or
Document on the Document Table” on page 7.
3. Follow step 3 in “Standard Copying” on page 7.
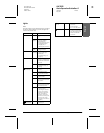
4. Press the paper type button to select Photo
Paper.
5. Press the paper size button to select A4 or 10x15.
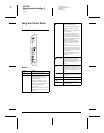
For more information about selecting paper size,
see “Buttons” on page 4.
6. Press the Fit to Page button. The Fit to Page light
comes on.
7. Proceed with step 6 in “Standard Copying” on
page 7.
Small Margin Copying
1. Follow steps 1 to 3 in “Standard Copying” on
page 7.
2. Press the paper type button to select Photo
Paper.
Note:
You cannot make a copy with small margins when
Plain Paper and A4 are selected.
3. Press the paper size button to select A4 or 10x15.
For more information about selecting paper size,
see “Buttons” on page 4
4. Proceed with step 6 in “Standard Copying” on
page 7.
Fit to Page Copying
Note:
You can only reduce or enlarge the scanned image to A4
or 10
×
15 cm.
1. Follow steps 1 to 3 in “Standard Copying” on
page 7.
2. Press the paper type button to select Plain Paper
or Photo Paper. For more information about
selecting the paper type, see “Buttons” on page
4.
3. Press the paper size button to select A4 or 10× 15.
For more information about selecting the paper
size, see “Buttons” on page 4.
4. Press the Fit to Page button. The Fit to Page light
comes on.
5. Proceed with step 6 in “Standard Copying” on
page 7.
Canceling Copying
To cancel copying, press the y Stop button. Once this
has been pressed, all lights on the control panel will
light up briefly.
Note:
Do not pull on the paper. The paper being copied will come
out automatically to the output tray.