


2
Chapter 1: Installation
Preparing for Installation
To prepare for installation, follow the steps described in this chapter.
1. Ensure ESD protection (see “Ensuring ESD Protection” on page 2).
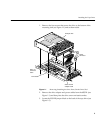
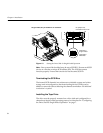
2. Unpack the tape drive and save the packing materials (see “Unpacking
the Tape Drive and Saving the Materials” on page 3).
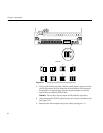
3. Check the tape drive accessories (see “Checking the Tape Drive
Accessories” on page 3).
Ensuring ESD Protection
If you are installing an internal tape drive, follow these procedures to protect
the tape drive from electrostatic discharge (ESD):
• Attach a ground strap to your wrist when connecting/disconnecting
the drive.
• Do not disconnect the power cord from the wall socket and the chassis if
you are servicing a system or installing a hardware upgrade. You will
lose the system ground and could damage the equipment as a result.
• Ensure that you and all electrical equipment that you handle during
this installation are at ground potential to avoid damage from ESD.
• Leave the tape drive in its antistatic bag until you are ready to install it.
When possible, remove the internal tape drive from its bag and install it
directly into the computer without setting it down. If you must lay the
tape drive down, place it on top of the antistatic bag or mat.
• If possible, use an antistatic mat and grounded static protection
wristband. If a mat and wristband are unavailable, touch a known
grounded surface (such as your computer’s metal chassis) to discharge
static electricity from your body before handling the tape drive.
• Limit your movement. Movement can cause static electricity to build
up around you.
• Handle the tape drive carefully and by the edges.
• Do not place the tape drive on top of the computer or on a metal table.