


QS-1CrossPoint 300 Matrix Switchers • Quick Start
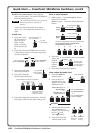
Quick Start — CrossPoint 300 Matrix Switchers
Installation
Step 1
If desired, mount the switcher in a rack.
Step 2
Turn off power to the input and output devices,
and remove the power cords from them.
Step 3
Cable the switcher for RGBHV, RGBS, RGsB,
RsGsBs, component/HDTV video, S-video, or
composite video input and output.
Step 4 (HVA models)
Cable audio models for stereo audio input and
output. High impedance is generally over
800 ohms.
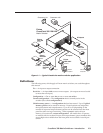
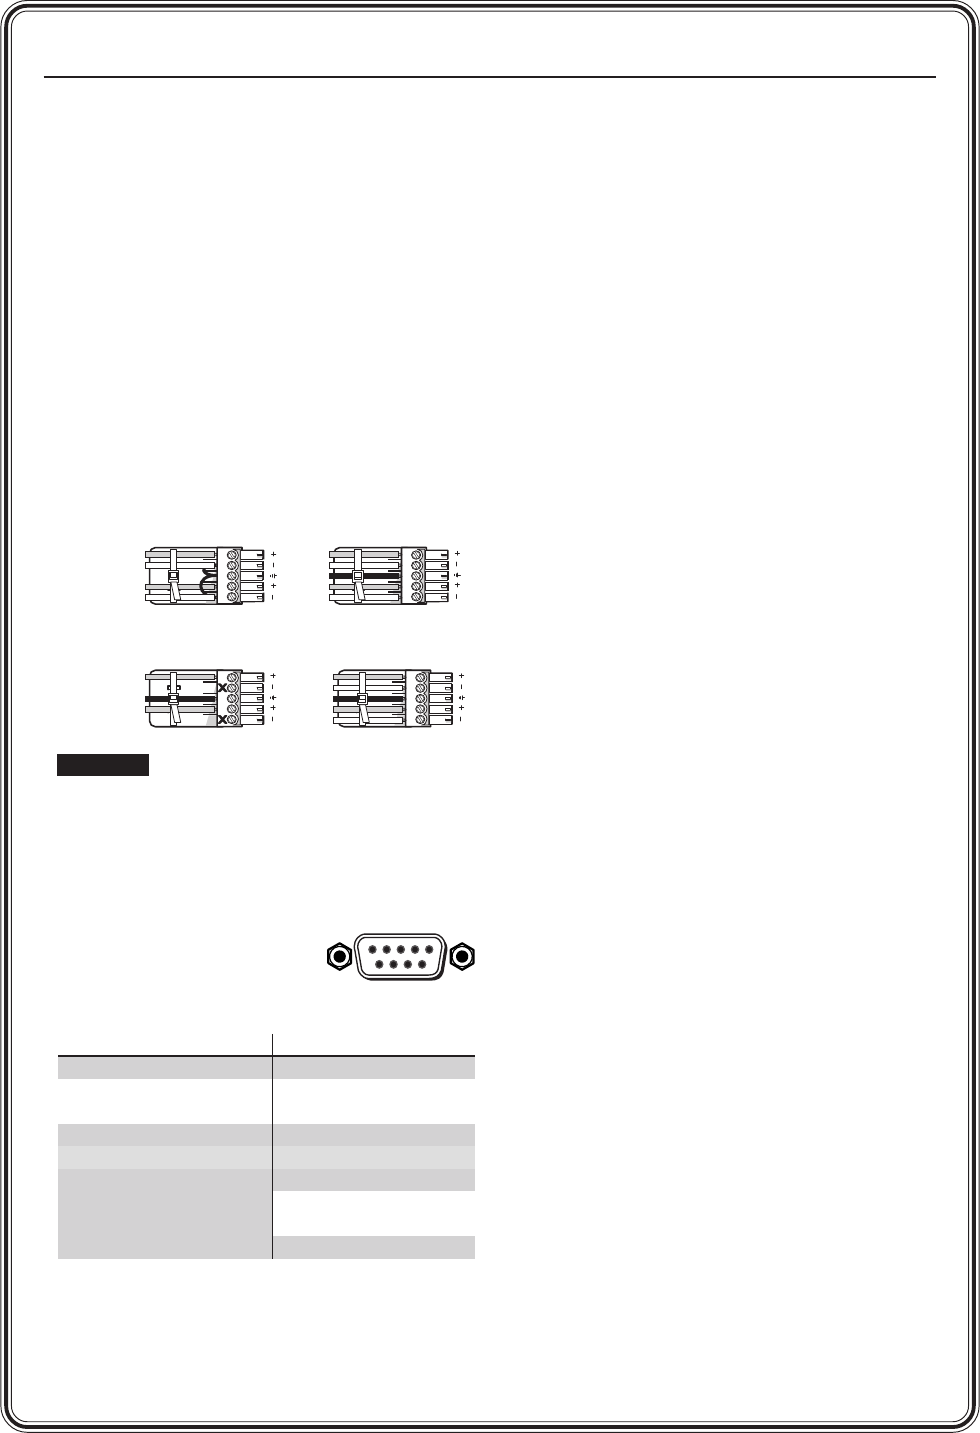
Step 5
If desired, connect a control
system or computer to the
rear panel Remote RS-232/
RS-422 port. Wire the
connector as shown below.
Step 6
If desired, connect a control system or computer
to the front panel Configuration (RS-232) port.
Use an optional 9-pin D to 2.5 mm mini jack
TRS RS-232 cable, part #70-335-01.
LR
Unbalanced Input
Balanced Input
(high impedance)
CAUTION Connect the sleeve to ground.
Connecting the sleeve to a negative (-)
terminal will damage the audio output
circuits.
(high impedance)
Ring
Sleeve (s)
Tip
Sleeve
Tip
Sleeve
Tip
Tip
Ring
Unbalanced Output
Balanced Output
LR
Ring
Tip
Sleeve(s)
Tip
Ring
Sleeve(s)
Tip
Tip
NO GROUND HERE.
NO GROUND HERE.
Step 7
Plug the switcher and input and output devices
into a grounded AC source, and turn on the input
and output devices.
Definitions
Tie — An input-to-output connection.
Set of ties — An input tied to 2 or more outputs.
Configuration — One or more ties or sets of ties.
Current configuration — The currently active
configuration (also called configuration 0).
Preset — A configuration that has been stored.
One preset can be assigned to each input
button. A preset becomes the current
configuration when it is recalled.
Front Panel Controls
Input and output buttons select inputs and
outputs. Input and output LEDs light to
indicate video and audio ties.
Input buttons also select presets.
Output buttons also toggle video and audio
mutes on and off in View-Only mode.
On HVA models, the output LEDs also
display the selected input’s audio level.
Enter button saves changes.
Preset button selects:
Save Preset mode to save a configuration as a
preset.
Recall Preset mode to recall a previously-
defined preset.
View button selects a View-Only mode that
prevents inadvertent configuration changes
and allows output mutes to be toggled on and
off.
On HVA models, View decrements the level.
See “View, adjust the audio level” on the next page.
Esc button cancels selections in progress and
resets the front panel LED indications. The
Esc button does not reset the current
configuration, the RGBHV or video and audio
selection, any presets, or any audio level
settings.
On HVA models, Esc increments the level.
See “View, adjust the audio level” on the next
page.
niP232-SRnoitcnuF224-SRnoitcnuF
1 — desutoN — desutoN
2XTatadtimsnarT–XT
)
–(atadtimsnarT
3XRatadevieceR–XR)–(atadevieceR
4 — desutoN — desutoN
5 dnG dnuorglangiS dnG dnuorglangiS
6 — desutoN — desutoN
7 — desutoN+XR)+(atadevieceR
8 — desutoN+XT
)
+(atadtimsnarT
9 — desutoN — desutoN
Female
51
96