


RGB 460
xixi
xixi
xi/470
xixi
xixi
xi SC Series • Installation GuideRGB 460
xixi
xixi
xi/470
xixi
xixi
xi SC Series • Installation Guide
Installation, cont’d
5
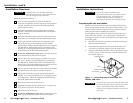
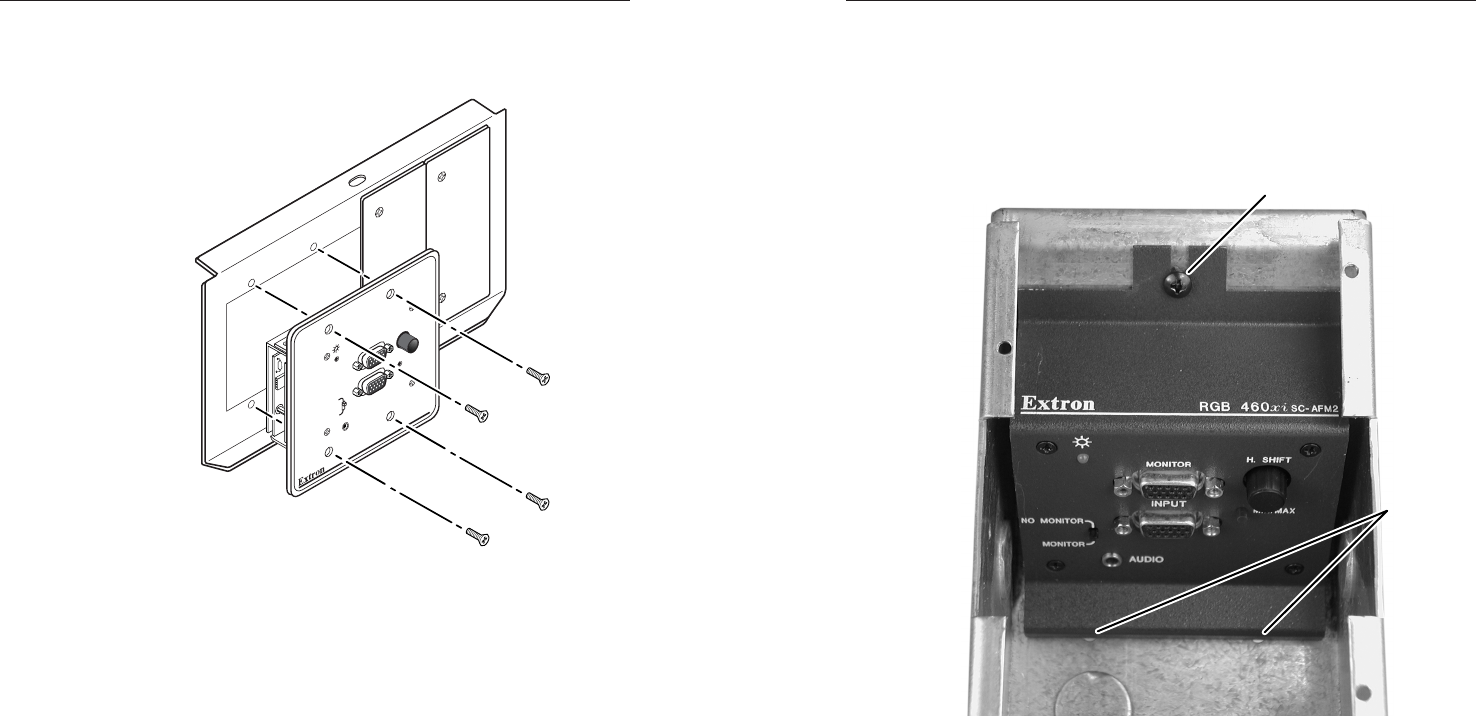
4. Mount the faceplate to the knockout box.
a. For the RGB 460
xixi
xixi
xi SC-AFM2 and
RGB 472
xixi
xixi
xi SC-AFM2, hook the two locking tabs on
the bottom of the faceplate into the slots on the
bottom of the box is mounted. Secure the faceplate to
the top of the floorbox with the included 8-32 x 1/4”
machine screw (figure 3).
8-32 x 1/4" Machine Screw
Locking Tabs
in Slots
Figure 3 — RGB 460
xixi
xixi
xi
SC-AFM2 installed
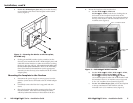
b. For the RGB 460
xixi
xixi
xi SC-AFM4, RGB 472
xixi
xixi
xi SC-AFM4,
RGB 464
xixi
xixi
xi SC-AFM6, RGB 474
xixi
xixi
xi SC-AFM6,
RGB 468
xixi
xixi
xi SC-AFM6, and RGB 478
xixi
xixi
xi SC-AFM6,
secure the faceplate to either side of the floorbox with
the included 10-32 x 3/8” machine screws (top) and
8-32 x 3/8” machine screws (bottom) (figure 4).
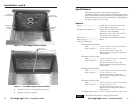
c. For the SC-AFM8 adapter plate, secure the faceplate
to the top and bottom of the floorbox with the
included 8-32 x 3/8” machine screws (figure 5).
4
4. For the SC-AFM8 adapter plate only, secure the device(s)
to be installed to the front of the faceplate with machine
screws (figure 2).
RGB 460xi
WITH ADSP
TM
INPUT
MONITOR
H. SHIFT
AUDIO
MIN/MAX
MONITOR
NO MONITOR
Figure 2 — Securing the device to the face plate,
SC-AFM8 only
5. Set the gain and DIP switches (or the switch(es) on the
device(s) to be installed in the SC-AFM8 adapter plate) and
cable and test the interface or other device before securing
the device into the wall box. The switches and cables will
be inaccessible after installation. Refer to the RGB 400xi
Series User Manual, Part #68-542-01 (or the appropriate
manual(s) for the device(s) to be installed in the SC-AFM8
adapter plate).
Mounting the faceplate to the floorbox
1. Disconnect the power supply to remove power from the
interface (or the device connected to the SC-AFM8 adapter
plate).
2. If installed, remove the floor box’s top panel and trim
frame.
3. Place the faceplate through the opening in the floor and
into the floorbox. Take care not to damage the cables,
which lay behind the interface in the bottom of the box.